Come On In

An old favorite haunt of ours has reopened this summer.  A warehouse in town where a construction firm once sold architectural relics is now new and improved.  A new generation of owners has made these treasures available again.  It’s even better than before.

What we once visited as Second Chance is now 7th Street Salvage.  Oh, never fear, there are still ample choices awaiting a second chance!


Catherine has an eye for detail and has glorious displays everywhere.  In addition to the warehouse holding years of accumulated doors and windows and stair railings, there are delightful vignettes of small treasures. Catherine has searched out more vintage delights and combined books and chairs and jars and hinges in the most unique ways. Her husband Brent is her partner in the endeavor.

The organization of bits and pieces is amazing.  Even the most OCD of us would love the cataloging of salvage pieces here.


I appreciate the old and dusty, and sometimes rusty, elements that are abundant in these places.  In some places we visit, a mad jumble encourages me to walk away.  That’s not a problem here.  Everything is grouped and categorized with clear price lists displayed.  The simple quantity of things like doorknobs and hinges and backplates and keys is astounding, but the organization is amazing.  Eat your heart out, Container Store.

. 


Look – tiles organized by quilt block usage: Half-square triangles and trapezoids ready to go!

And, who knew how educational such shopping could be?  Did you know chickens needed laxatives?  

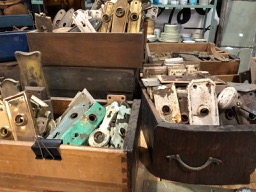
This display of doorplates had me spellbound.  I bought a couple and included one in a fabric collage about home.  And I learned a new word: escutcheon.

This amazing place is 7th Street Salvage in Macon.  Their schedule of open weekends is on facebook (https://www.facebook.com/7th-Street-Salvage-1903699043183111/).  The architecture of Macon is glorious.  To keep the elements of its historical beauty available to include in newer homes is a public service.

Here is the piece I am making using one of the doorplates I bought.  I used vintage linens and a house key from our ancestral past atop an overdyed quilt remnant to showcase the escutcheon.  It’s all ready to mount on a 16’ x 20” canvas here.


It looked bare.  So I’m auditioning edges.  What do you think?

Update: Here is a later post about the wall hanging once it was finished: I changed the name to Safe Haven.

Shade Tree Mechanics

Life imitates art.

On a recent adventure to a pottery festival, I saw this beautiful 1953 Chevrolet truck.  It was a glorious blue, beautifully restored, and photogenic from all angles.  But my favorite angle was this one because it mimicked the truck I put on a quilt a few years ago.


In 2015, when pondering a design for a raffle quilt for my husband’s local Vintage Chevrolet Club chapter, I decided to create a scene where men might tinker on their machines. I love including trees on quilts, so the title was easy 

The quilt measures 44” x 70“ and is a combination of needleturn appliqué, raw-edge appliqué, hand-guided freemotion quilting, trapunto, and printing on fabric.

I drew the design on acetate transparency and using my vintage overhead projector, enlarged the image to fill the background fabric pinned to my design wall.  The same technique was used to draw the freezer paper templates for the tree trunks and the various pieces of the truck.  I used commercial fabric to build the images, working from background to foreground as I attached the pieces.


I posted these photos to Facebook as I worked and it triggered many memories my students in math classrooms in days gone by.


The quilt top on the design wall before quilting began.


Wool batting was layered underneath the Chevrolet emblem on the tailgate, stitched down with water soluble thread.  Then the excess batting was cut away before layering the entire top on a cotton batting.

Freemotion stitching made the layers become one, a quilt.  In addition, that stitching was used to differentiate areas of the dashboard, windshield, and tire tracks on the ground.  Freemotion stitching was used to attach the raw-edged leaves as well. 

A photo of an antique car tag was scaled to fit the license plate space and printed onto fabric.  Blue was chosen for the 1953 model truck because there is such a truck in Jim’s family.  And blue…well, it’s blue.

A bowtie-shaped Chevrolet icon served as the basis for the handwritten label.  Sadly, I don’t seem to have a photo of that.

Note:  One purpose in writing this blog is to record details of quilts I’ve made.  I had written most of these details in a draft a couple of years ago, but the photo of a real truck like the one I fabricated spurred the post to publication.  As I read the details I had written, I was reminded how important it is to write things down.  I had forgotten the details of the wool batting layer, raw edged leaves, and thread choices.  

Especially since the quilt is no longer in my possession, the written description of the process is more valuable in case I want to do something similar again.

Another note: Many of these photos were made with an older iPhone and poor lighting conditions.  Reducing them to post online makes for even poorer quality, but clicking on the image to enlarge it may reveal some details you miss in the original.

Backsides


I like backsides.  When I’m doing street photography, I often focus on images of people from the rear.  Maybe that’s because I think the result is more likely to convey a universal truth than if the face is there; identifying the individual as, well, an individual.


With quilts, too, I like the backsides to be interesting compositions.  The expected traditional way to back a quilt is to use yardage of one fabric.  I admit I do that sometimes.  But most often when I do that, I find the result to be boring to me.

I often piece the backs of my quilts, especially the large ones.  The blue “wonky star” above is on the back of GBI Blues.  I included lots of my favorite blue fabrics that hadn’t found a home on the front.  In 70 and Still Wearing Jeans, I used pieces of fabrics collected for Jim’s quilt where the images were too large to include in the stars on the front.

In Seven Black Birds, I incorporated the discarded half-square triangles created for the sashing in the back.  That quilt hangs on a ladder in the den and more often than not, the “back” side is what is turned out to the viewer.  That’s the quilt here on the hayrack and bicycle.

Sometimes I have fabric that I don’t want to cut up into little pieces for use on the front of the quilt, so I use a whole piece of it as the back of something.  That way I can leave the piece as a whole unit. The toile piece in the photo above is on the back of Blue Tumbling Blocks, a small wall hanging described here.   I recently wrote about Linen Baskets in which I did the same thing with a fabulous Jane Sassaman print.

My most recent piecing effort was inspired by a piece of fabric I’ve had in my stash for many years.  I just didn’t want to cut it up.  So a pattern involving books (paper foundation pieced) seemed perfect for the front of a quilt with the “reading” fabric on the back.  So, it’s true.  I designed a quilt with the back planned first.  Here is a photo of the backing fabric folded on top of the pieced top.  More details and photos will follow when the quilting is done.

Seven Black Birds

Seven Black Birds is a quilt that’s been on an outdoor photo shoot and I promised more details of its story – a few months ago.

Later is better than never, so here it is.

My friend Kathleen and I shared a love of needle turn appliqué and wanted to make a large album style quilt, each using the same pattern, but varying the fabrics.  We chose the Friendship’s Garden pattern by Barb Adams and Alma Allen.

We shared the plan with other guild members and soon had 20 or more members each making her own version of this project.  At one of our guild’s quilt shows, nine completed quilts made from this pattern were hung together so that visitors could see how individuals personalized their own creations from one common pattern.

I kept detailed photos of my work in progress, so I can share some of my design process through the story of this quilt.

I found a toile fabric in soft shades of brown for my background.  The country scenes in the toile seemed to fit the mood of the pattern  and I chose rich reds, greens, and browns for the appliqué.


Before I was done, the primitive birds in the pattern had been replaced with more sophisticated ones, and I put a blackbird in every wreath in the design.  The one with the nest and its contents inspired the title.  I love to watch people try to find all seven birds.

I made all the sashing blocks (half-square triangles) the pattern described, but when I put them on the design wall, they seemed to overpower my appliqué.  In this photo, some of those triangles have been stitched together, others are just clinging to the design wall.

I redesigned the sashing in a few different ways, auditioned those, and chose the “on-point” strips of squares.

seven black birds

The original sashing pieces were added to the back, making that construction more complex than the front.  But I love it!  This quilt is often displayed on a ladder in the den, and the back is the side turned “out” as much as the front.  The photo above shows the entire back of the quilt as it was hanging at the Ga National Fair.

I quilted the big assembly (it finished at 84″ square) on my faithful Bernina home machine.  Using a 50-weight, two-ply cotton thread I danced with my sewing machine. (I’ve written many posts describing my free motion quilting technique, and if you put that phrase in the search box on the right side of this page, you will find many references.  Perhaps the  process has been described in the most detail here.)

This quilt was finished in 2009.  The photos are from several cameras, some indoors, some out.  That’s why the colors seem so different.  The earlier post with photos at The Farm House Restaurant is here.

Meeting Sue

“Those are quilts?”

“How did you do that?”

“You mean these aren’t paintings?”

“Wow.”

“I’m amazed.”

These are phrases I overheard while standing near the booth where Sue Turnquist was demonstrating her art at the Georgia National Fair in Perry.  I’ve been an admirer of Sue’s work for several years, but had never had the chance to meet her.  We share a love of stitch, a passion for storytelling though cloth, and have trod some of the same soil in south Georgia.  I was delighted to have a chance to finally talk with Sue and learn more about her quilts.

Sue began quilting in the 1990’s after being entranced at the state fair in Missouri.  She bought a sewing machine and taught herself to quilt, beginning with traditional patterns.  A class with Caryl Bryer Fallert changed her approach, and she’s become a star in the quilting world.

Sue’s background in veterinary medicine is reflected by the animals she depicts in her quilts.  The selections you see in the photos are all Sue’s unique creations.  She starts with a photo, has it commercially enlarged, then creates her pattern.  Fabrics are fused to a background and she uses free-motion machine quilting to stitch it all down. Her attention to detail and precision cannot be denied.  And the visual impact is amazing!

Her zebra quilt is entitled Do These Stripes Make My Butt Look Big?  This quilt has won many awards, including the New Quilts from Old Favorites challenge by the American Quilter’s Society.  This and other of Sue’s quilts have traveled and exhibited extensively, nationally and internationally.  Sue  travels to guilds to share her work and teach classes.  I’m sure those audiences are as enthralled as the visitors I overheard in her booth.  Her work is amazing!

Other quilts you see pictured include Skeeter Eater, Piney Woods Mule, and Pony Express.


Sue’s winners at the fair for this year’s competitons are shown below:

Treasures from Toshi

I saw Toshi a few days ago and she came bearing gifts – delightful sacks of fabric scraps.  One was silk, the other indigo cotton.

The Japanese silks were from Toshi’s sewing basket.  A friend had sent her some fabrics from Kyoto, others Toshi had kept from her sewing days.  There was a baker’s dozen silk remnants in all colors, sizes, and weights.  The light reflected off all those colors delights my soul!

And, then, there was the dress in another bag.  Indigo.  I don’t know how old.  Toshi wouldn’t guess, either.  She had begun deconstructing the dress because the indigo is so precious, so beautiful, it needed to be reused somehow.  For sure, it does.  I am thrilled beyond belief.  I was delighted to find woven cotton earlier this year (in black), with a variety of weaves across the yardage.  But to have this in indigo blue, in fabric with a history, oh, my, my.

Even the bags in which Toshi brought these delights were thrilling to me.  The silk remnants were in a small plastic bag with French writing, the outer bag was a Japanese store’s bag with, as you would expect, practical, simple, elegant handles.  And the moment of serendipity came when I realized the dress was in a bag imprinted with the name of a church where Jim’s great-grandfather was once the preacher.  And Toshi has no knowledge of that family history.

Isn’t it fascinating how time and people are woven together?

I’ve incorporated some of the indigo cotton into some blocks I’m hand stitching and I’ve cut squares from each of the silks to make a sampler piece.  The rest will be incorporated into my silk collection for a stunning project.  I think I have enough variety now to make something special.

An update on the baskets on my design wall – they are now assembled into one unit.  The moment when many blocks become one piece of fabric, a quilt top, is always satisfying to me.  In this case, there were 39 blocks and 22 setting triangles stitched together.  Now it’s pinned to my design wall while I contemplate whether to add borders or not, and, if so, what they will look like.

I’m including two photos in the progress of assembling the blocks.  The green bits of tape were used to number blocks as I moved them to the sewing machine, the safety pins reminded me which way to press the seams so they nested when the rows were sewn together.

You Can Make Anything

I’ve long had a quilt in my mind called Family Lines in which I would record oft-repeated lines from family members.  It would bring warmth as a cover, but also warm memories for others to recall the voices from the past.  Some of those lines I’ve already written about, like Daddy singing “Pa, he bought him a great big billy goat…” or Wallace’s oft-quoted line “you shore can’t sop syrup with ‘em.”  Advice like Aunt Nellie’s, “Always plant geraniums in clay pots,” and Jim’s   query to the girls, “did you unplug the curling iron?” will add practical notes, too. (Details of those stories are here, here, and here.)

One line I would have to include from my mother is, “You can make anything.  But you can’t make everything.”  I quoted this to a young quilting friend of mine last year as we were discussing some of the tempting patterns for making tote bags.  Though they are lovely and give one a unique accessory that displays favorite fabrics and techniques, they are time consuming to make.  She repeated my mother’s line and said, “Wow.  That’s so true.  And a powerful line to remember.”

Yes, she was right – it is a powerful message.  I’ve had that line running through my head a lot lately.  I look around my sewing space and see fabric waiting to go in the dye pot, fabric that’s been dipped in the dye pot and ready to compose into Rescued Remnant pieces, photos to print on fabric, strips of fabric waiting to be woven backgrounds ala Jude Hill.  In my sketchbook is a series of churches I want to put on cloth. On my design wall are components for my Paducah journal quilt in progress. In another basket are luscious wools cut and ready to stitch.  Of course, the time for the guild challenge draws closer.  And there’s more, including a few UFOs that could command my attention.

Then there’s the avalanche of images and ideas that press into my mind wherever I look.  Especially if I look online.  Projects that are physically unbegun, but I have to resist the temptation to begin them.  My mother also said, “Finish what you’ve started before you start anything else.”  ( I know –  the mention of a few UFO’s tells that I don’t always follow that advice.)

I try to use the brainpower generated by my morning walk to plan my “work” for the day. (I put that word in quotes because I do think of the “do the work” advice given to artists fits my daily activities, but in no way is what I do in the sewing room anything but FUN.)  Lately my focus of that brainpower has been to narrow the field of possibilities and remember, to paraphrase my mother’s advice, “I can do any of these things, but I can’t do all of them today.“

The photos show snippets of today’s temptations.  At least one of those will get some focused attention.

What’s in a Name?

Sarah Beth, Sarah Bob, Sarah Frances.  Margaret Ann, Lou Emmelyn, Mary Frances; all are common names in the South.  And with women, both halves of the double names are used on a daily basis.  Shortened forms of Mary Elizabeths I’ve known were Lilly Bet, Mae Liz, and the ever popular Mary Beth. To get the right perspective here, you should read the list aloud, slowly.  Very slowly.  Put a little twang in there.  Now you’ve got it.

Names run through cycles of popularity.  In one generation, almost all the Sadies have died out.  Then there is a rash of little Sadies running around. I think that particular name is beautiful, because it is beautiful, and the Sadie (actually in her generation it was Sadie Belle) in my life was a beautiful person.  She is the woman pictured at the top of this post.  There was a beautiful Cleo in my life, too.  But I’m not hoping to see that name resurrected.  The same goes for Ena Belle, Maudie Lee, and Mary Etta.  Those don’t roll trippingly off the tongue.

In the South, if a woman doesn’t have a double name already, we make it so by adding Miss or Aunt.  Miss Lily, Miss Emily, Aunt Gladys (though no kinship exists) were big in my life.  And then I became Miss Sandy.

When it comes time to naming quilts, I sometimes resort to the southern names of my childhood.  I’ve made a Miss Lily’s Basket, Ruby’s Red Bouquet, Miss Emily’s BasketsOllie Jane’s Flower Garden was named for my grandmother and the pieced pattern used for the center.  Granny Zee’s Scrap Baskets has a sentimental reason for its name, too.

Miz Sadie Turns 80 was made for my mother-in-law in 2004.  The blocks are the traditional Ohio Star blocks, finished at 9”.  Sashing is 1” wide (beginning my insistence that narrow sashing separates, but doesn’t overwhelm the blocks).  The overall quilt measures 63” square. It is pictured here hanging at the Georgia National Fair in 2004, one of the first quilt competitions I entered.  It won a blue ribbon, and Miz Sadie was so pleased that she asked if she could have the ribbon, too.  The quilt hung in her home with ribbon attached, as long as she lived there.

The label is a sunprinted image using metal letters used in scrapbooking as the mask.  I didn’t have three lower case s’s, thus the spelling of Miz. The quilting is a pantagraph done by Pat Holston on her longarm.  This quilt was featured in a Kansas City Star publication, My Stars, in 2009.


The Kite

In 1952, he was four years old and wanted to fly a kite.  In this photo, he watched as his Daddy held the string and the kite climbed higher and higher.  The air was crisp, the wind pulling the string quickly.  At the moment the photo was taken, the boy sensed disaster on the horizon.

He was right.  Shortly after the shutter clicked, the string broke and the red kite was gone.  As the little boy grew, more kites flew and did not fly away, but the anxiety born that day was ever present when the kites were in the air.

When asked for appropriate titles for this art quilt, he said, Childhood Trauma, or Hold Tight, Daddy, or Don’t Let Go, would all be appropriate.  In truth, he barely remembers the day, and probably wouldn’t remember it at all were it not for the photo.  This is exactly the kind of experience I love to capture in cloth.  A memory.  A story.  A moment frozen.

I printed the photo on a piece of vintage linen from an old tablecloth and added color to the boy’s jeans and cap with watercolor crayons.  I had overdyed some old linen in the indigo vat that looked a lot like a winter sky, so I cut the foreground image from the photo and stitched it to the blue.  I appliquéd the kite using a bit of French General red fabric, and hand embroidered the kite string and tails.  When I added machine quilting stitches, I used dark thread to emphasize the fence posts and trees.

I finished the piece by attaching the fabric photo unit to an old quilt remnant, adding borders of ribbon and a coarsely woven red checked fabric.  Hand and machine stitching were used for this step.  The piece finished at 16” x 22”.  A vintage doily serves as the label.


Star Over Tahiti

This time of year I often think, “I need to make more red and green quilts.”  And, I sometimes stitch using those colors, part of being  in the holiday spirit.

But here is a quilt I made one Christmas season that isn’t red or green.

I needed something seasonal to hang above the table where my Nativity scene would live for the holidays.  I had always loved the raw-edge technique of Rosemary Eichorn’s work, and had enjoyed making Stella, Harvest Princess using that method.  I was in a hurry to have something on the wall, so I was off to the fabric store to find ancient biblical – looking foliage.

I came home with some leafy fabric, did some fussy cutting, and went to work.  The patchwork sky was easy.  I had some brilliant blue fabric with flecks of sparkle that made for a perfectly magical sky.  I drafted a star with some elongated points, stitched that in place, and cut Bethlehem-like buildings free form.  Then I added palm trees and was proud of my accomplishment.

Jimmy G, who had been called upon a few times to give names to quilts, promptly named this one Star over Tahiti.

Whatever you call it, it served as a backdrop for the nativity scene.  And, I learned some ways to get a functional piece together in a minimal amount of time.
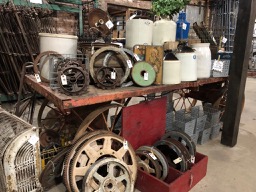
Finished measurements are 22″ x 30″.  I used cotton batting, cotton thread.  The quilting stitch secured the free-form pieced elements and raw-edge appliqué, all accomplished in the quilting process.