We have a new Christmas quilt in our house this year.
This large quilt was finished earlier this year, but I wanted to share it at Christmastime. It hasn’t been on a photo shoot outdoors yet, but here are some shots and its stitching story.
The design is from a Barb Adams and Alma Allen book, Where the Cold Wind Blows. The pattern Mistletoe and Holly looks quite different in their version, but the appliqué basket is their creation.
I had this fabulous toile-like fabric that looked a bit Christmasey to me, with lots of green and brown and red. Wanting to leave big swatches of that intact in the background, I chose to do minimal piecing.
I did like the pieced stars that Barb and Alma had included, so I pieced a few stars.
One it was assembled, it needed a bit more color, so I inked my initials and their title Mistletoe and Holly in red.
It needed a bit more red, so birds flew in and landed in some spaces.
I was teaching paper foundation piecing, so used that technique to add a spiky border.
I quilted it on my Juki with a combination of freemotion echoing and several filler designs.
I chose to give my version the title A Christmas Garden. It measures 60” x 78”.
Yes, I’ve been sewing in this safe-at-home time. I’ve been busy finishing old abandoned projects as well as exploring new ones.
One of the new things I’ve done is this piece I called Dots and Vines. Inspired by my grandmother’s quilt on this table in our den, I assembled many many circles appliqued on squares.
Ollie Jane’s quilt lives on this table most of the year and I continually look at it and think, what a powerful design. I ought to recreate it. Finally, I did.
Though it doesn’t look much like her work (nor much like mine, for that matter – it’s rather modern, don’t you think?), it’s another example of stitching that reflects the love of cloth through generations; a tale that never grows old.
I chose to use Cherrywood handdyed fabrics. The circles are 1” in diameter, the squares finish at 3”. I spent many morning hours on the porch stitching these, and many more hours doing the same at night in front of the tv. Many hours of delicious time thinking and soothing the soul while pulling a threaded needle through cloth.
There were days when the finished blocks danced all around my design wall, trying to find the right arrangement of color. Here you see them with several fabrics I considered using as borders.
But the final arrangement has no border. A nice stripe from Kaffe Fassett’s collection as binding seemed to bring enough closure.
I knew the entire time that I wanted to quilt a meandering vine from variegated thread, so that’s the rest of the title, Dots and Vines, a bit of homage to a book I came to love in college math classes, The Dot and the Line. I considered August 12, 2020 as its title – that’s the day I finished the quilt and it just happened to be the 225th day of this calendar year. But that title requires too much explanation in casual conversation, so Dots and Vines it is.
I made many more circle blocks that are waiting another use. But the 225 that I chose means I have a 45” square finished piece. I like that size. It’s good to drape over a chair, take along on a photo ride-about, or use as a table topper.
I continue to stay busy with a variety of things, including nature photography. But most things are connected to fiber in some way. Don’t you think it would be interesting to make a textile version of these mushrooms? I see red thread here.
More about my grandmother’s quilts can be found here and here. Enter “Ollie Jane” in the search box for even more.
This is the month to see hearts everywhere, and I LOVE it!
Hearts have long been one of my favorite motifs and they often show up in my quilts. My quilt guild, (Heart of Georgia is its name – coincidence you think?) has themes for some of our Show and Tell sessions this year.
We always bring new quilts we’ve recently finished, but the themes let us revisit favorite old quilts that we haven’t shared in a while. Show and Tell is always inspiring and this variation allows new members to our group to see some past works they missed.
So I’ve been thinking about hearts in older quilts of mine, looking around the house at older pieces.
One I found was this one Hearts and Ribbons– a project I made in the first appliqué class I took. Anita Shackelford was the teacher. An excellent designer and teacher, she guided me through the intricacies of needle turn appliqué. Though some of my work is more casual these days, I owe her all the credit for my beginning stitches in this technique.
This piece features hearts that were made and stuffed, then hand quilted. Later, they were attached to the background including other appliquéd elements.
The stuffed berries and delicate embroidery just add to the rich details of the piece.
This was one of my first efforts at free motion machine quilting, too. I think I used an invisible thread and cotton batting.
I don’t suppose anyone is surprised that the featured color here is blue.
It was a gray day when we recently visited Fairhope, Alabama, but I had a bit of color in my purse.Early in my quilting adventures (2003, I think), we visited Fairhope and I saw a log cabin quilt made from reproduction feedsack fabrics.I came home and started sewing.
When we headed to Fairhope last week, I rolled the little quilt and tucked it into my purse just in case there were any photo ops.
The skies were heavy, so I stopped at the first picket fence with a color-coordinated house behind it, and snapped this view.
In a couple of shops, I saw welcoming vignettes and store owners graciously let me drape the fabric about their merchandise.It’s amazing what a crazy old woman can get away with if she bothers to ask.
In a tee-shirt shop, I was amazed that they had laid out a display of shirts in just these feedsack colors!
And then, Sailor sauntered by and plopped down for a nap.He was kind enough to model the quilt, creating a unique spot for Fairhope Feedsacks to rest.
At the pier, pilings and tree roots served as quilt racks.
And, at a candy store, more fences, porch railings, an old dresser, and even a baby carriage, a blue baby carriage, gave the little bit of a quilt a place to perch.
Now I’m looking for places to take some other small quilts.I love making the little ones.And since I”m doing it for fun, who cares what size it is?I know a lot of people think a quilt has to cover a bed.I’m so glad they are wrong!
Fairhope Feedsacks measures 19” x 24” .The logs finish at3/4” wide.I probably used Dream cotton request batting and cotton thread.
Lessons learned from this quilt:
Washing a quilt gives it a softened aged look instantly.
I personally don’t like the same fabrics used in the same position in a log cabin (that’s what I did here, giving the double dose of turquoise every time the blocks meet).I like the colors to be more random, scrappier.
The result, this little piece, was one of my first attempts at free motion quilting.I used a variegated thread and a simple meandering stitched path.It’s not complicated, It’s not a competitive piece, but the little quilt is pleasing to hang about the house…or on fence posts, or at the beach, or on a cooperative doggie.
Here is a photo of Fairhope Feedsacks at home, atop the clock in the breakfast room where it hung out all summer with a compatibly colored rooster.
On a recent Saturday ride-about, we took a big wool quilt in case we saw a spot for photos.We found a spot at Starr’s Mill, and gave Miss Nellie’s Country Garden some places to pose.
The quilt is my version of a pattern from Lisa Bongean of Primitive Gatherings.The wool appliqué is stitched by hand onto cotton background fabrics.The piecing together of the blocks and the quilting are done by machine.
As I worked on all aspects of this quilt, I thought of my Aunt Nellie.The wool appliqué – informal and free – and the garden theme led me to know the quilt had to be named for her.
She was known as Miss Nellie to most everyone in the community.I was lucky enough to know her as Aunt Nellie.She was a teacher, and so there are some people who knew her as Miss Hobby, too.She lived next door for my entire childhood, and serves to inspire me every day of my life.
She lived to the age of 91, and only in her 91st year was she unable to tend her garden.She grew vegetables to eat, to share, to can, and to freeze.She grew flowers for the joy of the bloom.
Aunt Nellie’s vegetable garden was neat and orderly, but her flowers were a riot of stems and leaves and blooms.Weeds were kept at bay in both places, but the separation she maintained in her butterbeans and squash was not valued in her flowerbeds.The snapdragons and pansies, the petunias and lilies and gladiolas all mingled about, with her snipping a cutting here and poking it in an empty spot there to take root and fill a space.And, take root they did.Her green thumb was legendary, possibly due in part by the load of fresh cow manure a local farmer delivered to her every spring.
She grew geraniums in pots, dahlias in aseparate bed all their own.She had a bit of yard art, too.I remember a whimsical bird bath, tiers of porcelain basins given to her by a friend.Once it developed leaks, it was repurposed as a planter for succulents.
So the whimsical nature of some of these quilt blocks is a perfect tribute to a woman from the country.The label is a block I had made because Miss Jump, one of Linda Brannock’s creations, reminds me of Aunt Nellie.
More quilt details:The quilt finished at 60” x 75”.I used a whipstitch to secure the wool to the cotton, usually with perle cotton thread, but sometimes with embroidery floss or even fine sewing thread.The quilting is all hand-guided freemotion stitching on my home machine.I used Dream Cotton Request batting and a cotton fabric for the background.And it was all fun!Just as Aunt Nellie would have wanted it to be.
Oh, and another detail.Because the wool is so visually heavy, I made a wider binding than I usually do.The “standard” 1/4” binding seems so wimpy on a large wool quilt, so I cut the binding 3 1/2”, then folded in half and stitched it to the front of the quilt with a hearty 3/8” seam allowance (or scant 1/2”).The binding then finishes (with these fabrics) at 1/2”. I used a woven plaid (easy to stitch down by hand) and cut it on the bias.
More about Aunt Nellie:I’ve written a lot about Aunt Nellie already, if you type “Nellie” in the search box, you’ll find several references to her.But, she is the older of the two “Spinster Sisters” in this post, where I shared more details of her: https://sandygilreath.com/spinster-sisters/
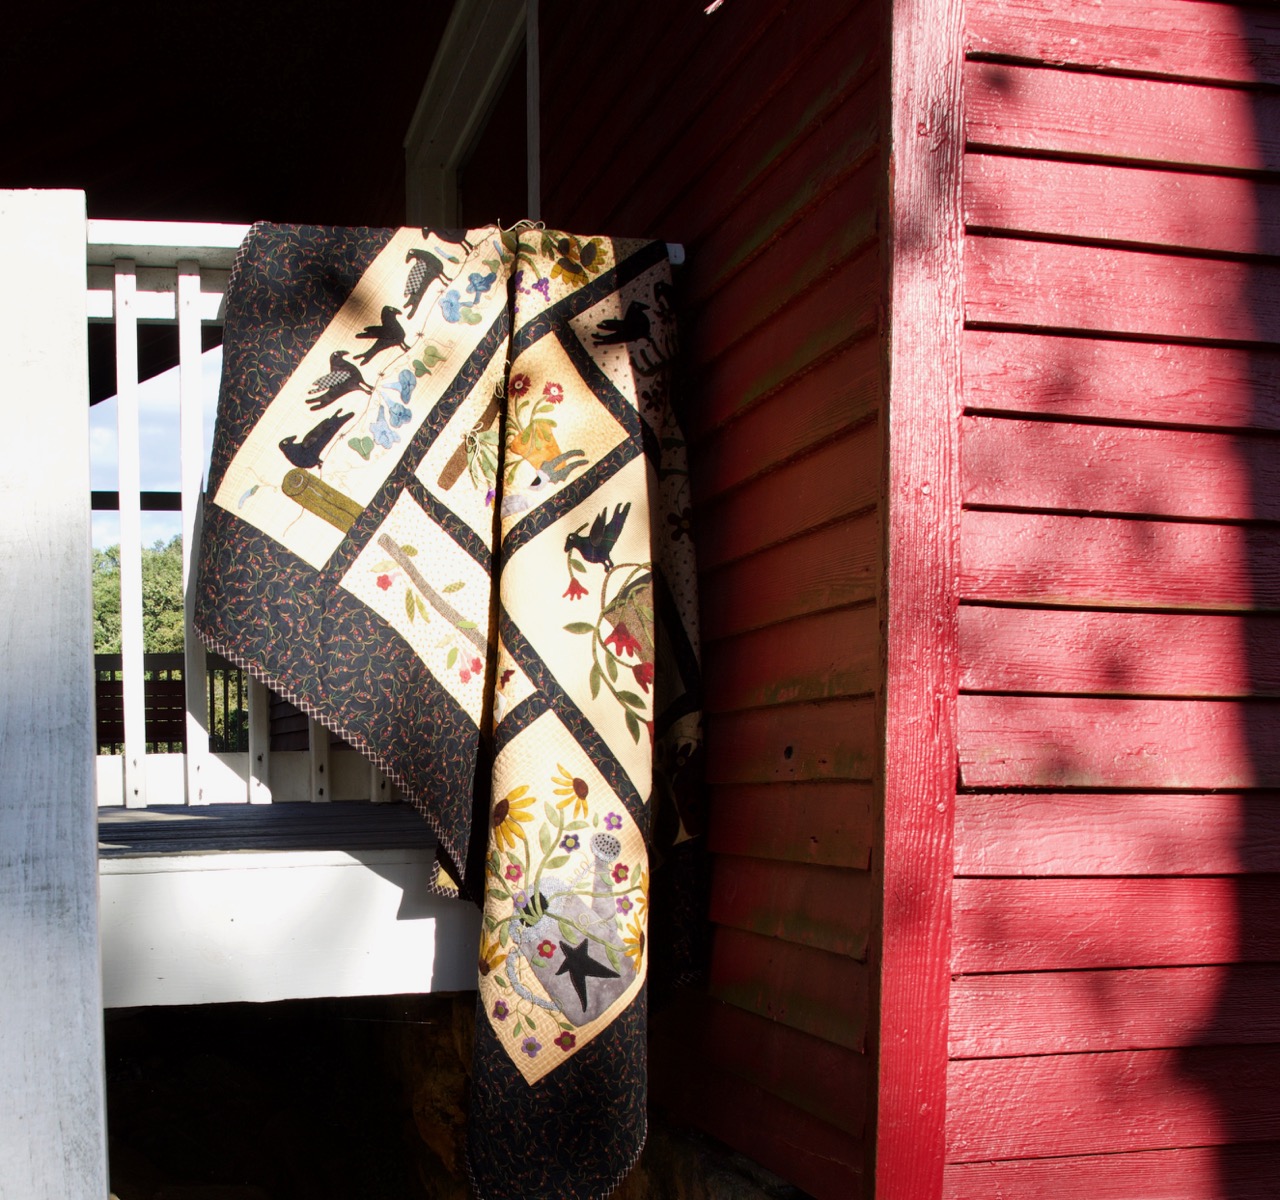
When I shared photos of quilts at Step Back, I promised details on the quilts I took on the visit. So, for those who are wondering about the Floozies quilt, here is its story.
On my first visit to Step Back, I mentally named this cabin “Waiting for Chinking,” since that’s the stage it’s in.I think there’s an art quilt with that title in my future, featuring this cabin.
When I later learned that this cabin is where the “floozies” hang out during the annual Christmas celebration, I knew I wanted my Floozies quilt to be photographed there.
One of the volunteers was kind enough to pose as a floozie with the Floozies! These fine upstanding women of the community act as hostesses at Step Back.They dress in vintage clothing and pose for photos and provide history lessons for visitors.
In other settings, Floozies is a brightly colored quilt. I love how the weathered gray of the buildings provides low contrast with the background fabrics; subduing things, making the birds seem right at home.
The title I used, A Flock of Feathered Floozies, came to me after a year of working on these birds to stitch them in place, then embellish them with beads and elaborate stitching using all kinds of rich threads.
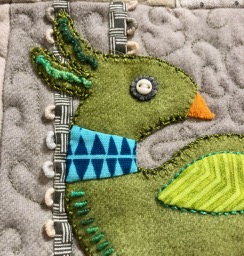
The pattern, hand-dyed wool, and accessorizing threads and baubles came from Sue Spargo in her block-of-the-month pattern a few years ago.I had taken a class with Sue in the past and knew there was a lot more to learn from her.And learn I did.
In each month’s packet there were actually materials for three blocks.Wool background, wool for the birds, instructions, and embellishing threads of cotton or silk, of all sizes and twists. There is a lot of detail in each block, so click on the photo to enlarge to see things more closely.
The project was time consuming for sure.These birds were my companions virtually every evening for a year.As we watch tv, I’m usually doing hand sewing.Sometimes it’s a binding, sometimes it’s appliqué, but for that year, it was these birds. Every bit of appliqué and embroidery was done by hand. The sewing machine was used only when it was time to assemble the blocks and then quilt the layers together.
I kept up with the schedule, finishing each month’s three blocks just in time for the delivery of the next.I would get an email from Sue’s son when the next month’s block had shipped.If I wasn’t done, I would stitch faster!My self-imposed rule was not to open a package until the previous blocks were completed.Since I was anxious to see what Sue had planned for the next birds, I made sure I was ready when the mailman came.
With Sue’s companion book Creative Stitches beside me, I learned all kinds of embroidery stitches I had not known before.The wool appliqué was done with a whipstitch with matching wool thread, so it’s virtually invisible.Then each piece was backstitched with a Valdani #12 perle cotton thread.Sometimes other threads were used for embellishing stitches, sometimes the Valdani.
The background pieces were often embellished with ribbon or linen or cotton fabric, as are the birds.Just look at the French knots on the linen portion of this block.
Of all the new stitches I learned, I think I was most fascinated with the drizzle stitches.See them here?They make a loose fringe-like decoration on the tail of the bird above, but if left longer, they can be couched down to hold them in place.
Once the blocks were completed, assembled, and a border (with a lot of wool circles appliquéd, surrounded by embellishing stitches) added, it was time to quilt. I used a thin cotton batting (Dream Cotton Request) and a free motion stitch to secure the layers. I love how the stitching shows up on the wool.
Obviously, many of these techniques are now part of my stitching repertoire. The quilt hangs in my sewing room, providing me with constant exposure to the idea to “do more, more, more.”And I do.
Sue’s title for this quilt (and a pattern is available now) was Bird Dance.But every southern girl knows that if a woman is overdressed; has too many accessories, she is in danger of being considered a floozie.I love to see people smile when they look at my work, and this piece has generated a lot of giggles when people see the title, A Flock of Feathered Floozies.
And, there is a still at Step Back. So Floozies collapsed there for a rest.
In case you missed them, earlier posts about Step Back are here (Christmas at Step Back) and here (my quilts visit Step Back). And this earlier post has details about wool appliqué.
On a recent adventure to a pottery festival, I saw this beautiful 1953 Chevrolet truck.It was a glorious blue, beautifully restored, and photogenic from all angles.But my favorite angle was this one because it mimicked the truck I put on a quilt a few years ago.
In 2015, when pondering a design for a raffle quilt for my husband’s local Vintage Chevrolet Club chapter, I decided to create a scene where men might tinker on their machines. I love including trees on quilts, so the title was easy
The quilt measures 44” x 70“ and is a combination of needleturn appliqué, raw-edge appliqué, hand-guided freemotion quilting, trapunto, and printing on fabric.
I drew the design on acetate transparency and using my vintage overhead projector, enlarged the image to fill the background fabric pinned to my design wall.The same technique was used to draw the freezer paper templates for the tree trunks and the various pieces of the truck.I used commercial fabric to build the images, working from background to foreground as I attached the pieces.
I posted these photos to Facebook as I worked and it triggered many memories my students in math classrooms in days gone by.
The quilt top on the design wall before quilting began.
Wool batting was layered underneath the Chevrolet emblem on the tailgate, stitched down with water soluble thread.Then the excess batting was cut away before layering the entire top on a cotton batting.
Freemotion stitching made the layers become one, a quilt.In addition, that stitching was used to differentiate areas of the dashboard, windshield, and tire tracks on the ground.Freemotion stitching was used to attach the raw-edged leaves as well.
A photo of an antique car tag was scaled to fit the license plate space and printed onto fabric.Blue was chosen for the 1953 model truck because there is such a truck in Jim’s family.And blue…well, it’s blue.
A bowtie-shaped Chevrolet icon served as the basis for the handwritten label. Sadly, I don’t seem to have a photo of that.
Note:One purpose in writing this blog is to record details of quilts I’ve made.I had written most of these details in a draft a couple of years ago, but the photo of a real truck like the one I fabricated spurred the post to publication.As I read the details I had written, I was reminded how important it is to write things down.I had forgotten the details of the wool batting layer, raw edged leaves, and thread choices.
Especially since the quilt is no longer in my possession, the written description of the process is more valuable in case I want to do something similar again.
Another note: Many of these photos were made with an older iPhone and poor lighting conditions. Reducing them to post online makes for even poorer quality, but clicking on the image to enlarge it may reveal some details you miss in the original.
Quick, answer this question:“What is Sandy’s favorite color?”
That line brought a big chuckle when I recently asked it at a presentation I was giving.
It’s a little obvious when my work is collected together.
But sometimes I like to add a bit of red and white to the blue, as I did in this piece that’s next on my list of “ready to quilt.”
I’ve mentioned before that I like to work seasonally.So a small project I made this year as July 4 approached was this one called Stars in Bloom.The pattern came from Blackbird Designs, and I interpreted it in cotton and wool.
The rich red flower petals are various reds from my wool stash, the most prominent being from that red cashmere coat I bought a few years ago. The vines and leaves and blue stars are cotton fabrics.
I certainly want the quilt label to be unique.It’s important to include a label identifying the quilt title, the maker, the date.A simple rectangular piece of cloth containing this information is better than nothing, but since I began quiltmaking, I’ve enjoyed including elements of the quilt’s design in the label.
Ollie Jane’s Flower Garden has a lily similar to the one on the front of the quilt as its label.Walker’s Pasture has a miniature photo of the front of the quilt on the label.Mom and Apple Pie’s label features a flag (an appliqué element from the front – and the label you see at the right).
That said, I may have gone a bit overboard in this small piece.The combination of hearts and stars on the front led me to include a heart and a star.It took a big star (well, big relevant to the size of the quilt) to contain the title and my name.Then an even bigger heart was needed to surround the star. Above, the view of the backside. Do you think the label is visible?
As has become my custom, I embraced the raw edge on this label.The star was machine stitched to the heart, then the heart was attached using the “glue stitch” I learned from Jude Hill, hand stitching the label through the quilt back and batting.As time goes on, the raw edges will fray more, adding to the charm of the back.Or to the tattered look, depending on your perspective.
More about Stars in Bloom:This piece finishes at 12” x 17”.The appliqué is a combination of wool and cotton.The cotton pieces are hand stitched needle-turn appliqué.Some hearts are made of felted wool and stitched down with a whip stitch, again by hand.The quilting is free-motion machine stitching (incorporating some hearts in the design) using silk thread on top and cotton thread in the bobbin.
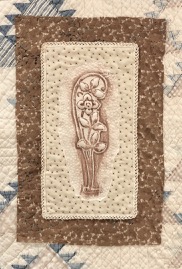
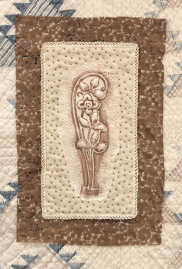
Ruth loved gardening.She loved the feel of the brown earth between her fingers as she planted bulbs and seedlings, anticipating the color that would come later.She reveled in a pleasant day with white clouds in a blue sky.
At least that’s how I imagine the Ruth whose family had this lily engraved on her headstone.
To remember Ruth forever, I made a crayon rubbing of the lily on silk fabric and added dimension and detail with free motion machine stitching.I added some lace and beads with hand stitching and layered it all atop an old quilt remnant.
I hope Ruth would be pleased.
Jim and I enjoy exploring cemeteries.Sometimes those walks end up in artwork.Earlier references to other adventures are here and here and here.
We headed out the door on a “Saturday ride-about”, bringing cameras and a quilt.This depot was abandoned at the moment, so we posed the quilt and snapped a few shutters.
This little quilt, Linen Baskets, is a sample I made a couple of years ago when my favorite quilt shop had a fat quarter bundle of linen fabrics.The polka dots are all linen, the white background is a Kona cotton solid.Finished, it measures 35” x 43”, a nice size to drape over a chair or hang on the wall.
I love the little baskets.They are adapted from a pattern called Big Bloomers from QuiltSoup.I added wool appliqué in the border with some beading and embellishments.
We live near Zebulon Road, but it doesn’t lead to the town of Zebulon.That fact amuses us.We have noticed many Zebulon Roads in the middle GA area which, when studying a map, do not lead to Zebulon either.So for this little quilt to get to pose on benches and doors and roof brackets of the depot in Zebulon was a fun note to add to our day.
The quilting is a quick loopy meandering trail done with cotton thread and using thin cotton batting.The backing is a bright fun Jane Sassaman design.Many people like basket quilts as much as I do, but when I take this to groups, there are always gasps of delight when they see the back of this one.
I liked the contrast of the soft quilt with the hard lines of the doors and the weathered wood of the floor boards.Jim did some of his darkroom magic on some of his shots, intermingling color and black and white.I never get tired of that!


