Sandhill Tree Farm

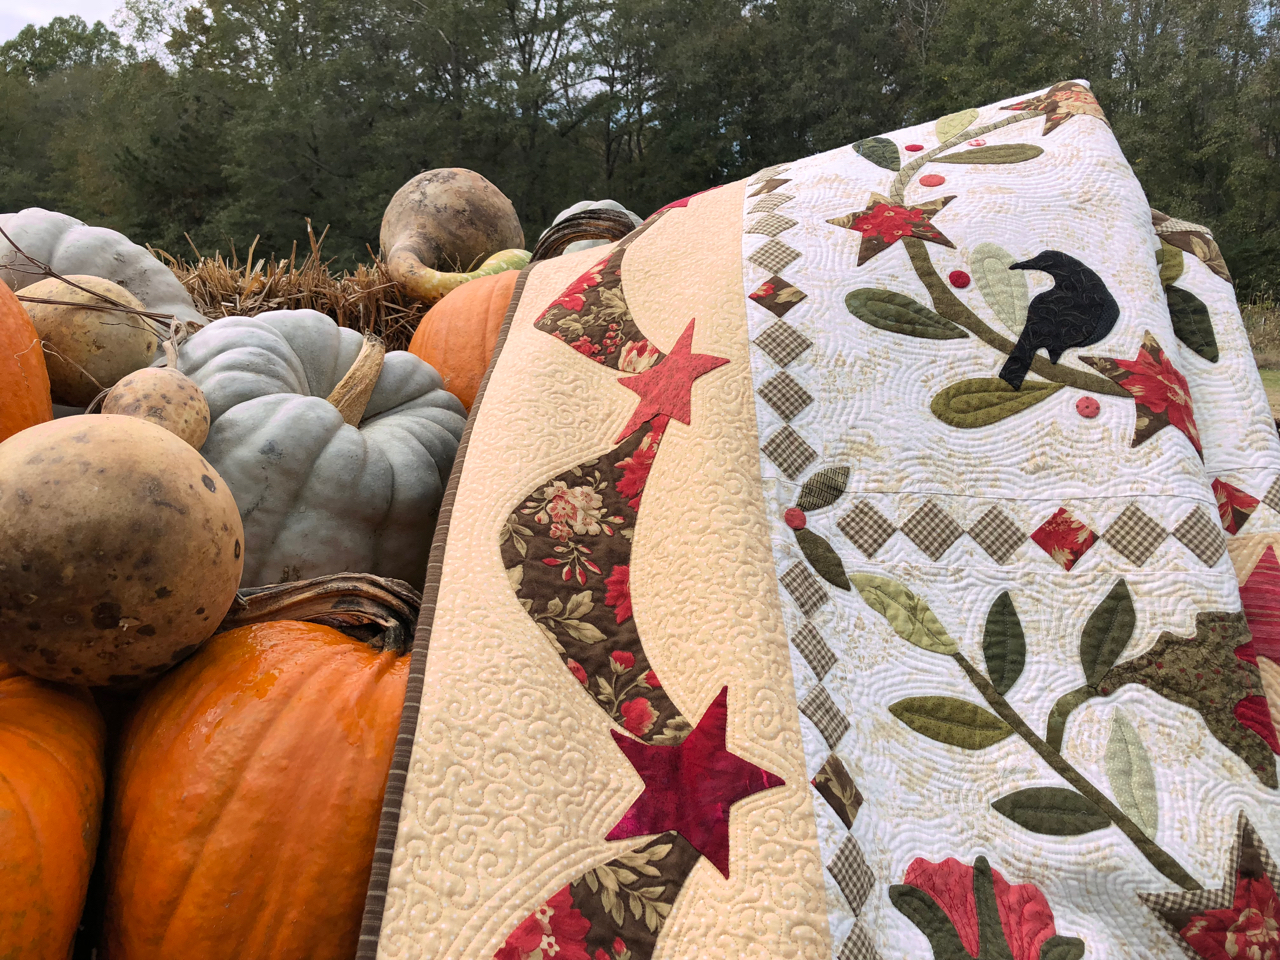
Sometimes on our quilts-on-location outings, I plan the colors of the quilts with the anticipated background.  But sometimes, I just grab some quilts that haven’t been photographed lately and head out the door.  On our recent outing to the state park with the cypress trees (that post is here), I carried along a quilt with neutral colors.  

The beauty of the browns and grays colors in this landscape made me glad I had grabbed this quilt.

I love neutral color combinations, but Sandhill Tree Farm is one of a very few quilts I’ve made in that genre. 

As soon as I noticed the colors of the park office, I knew that quilt needed to pose on those rocking chairs.  The color of the building’s siding was a great background for this one.  

Walking down Squirrel Run Trail, we found more neutral colors..and a splash of blue popped in occasionally.  There’s a plan for a quilt I could love…all neutral browns and grays with a pop of blue.  

Sandhill Tree Farm posed nicely on the railing of the deck near our picnic spot, too.

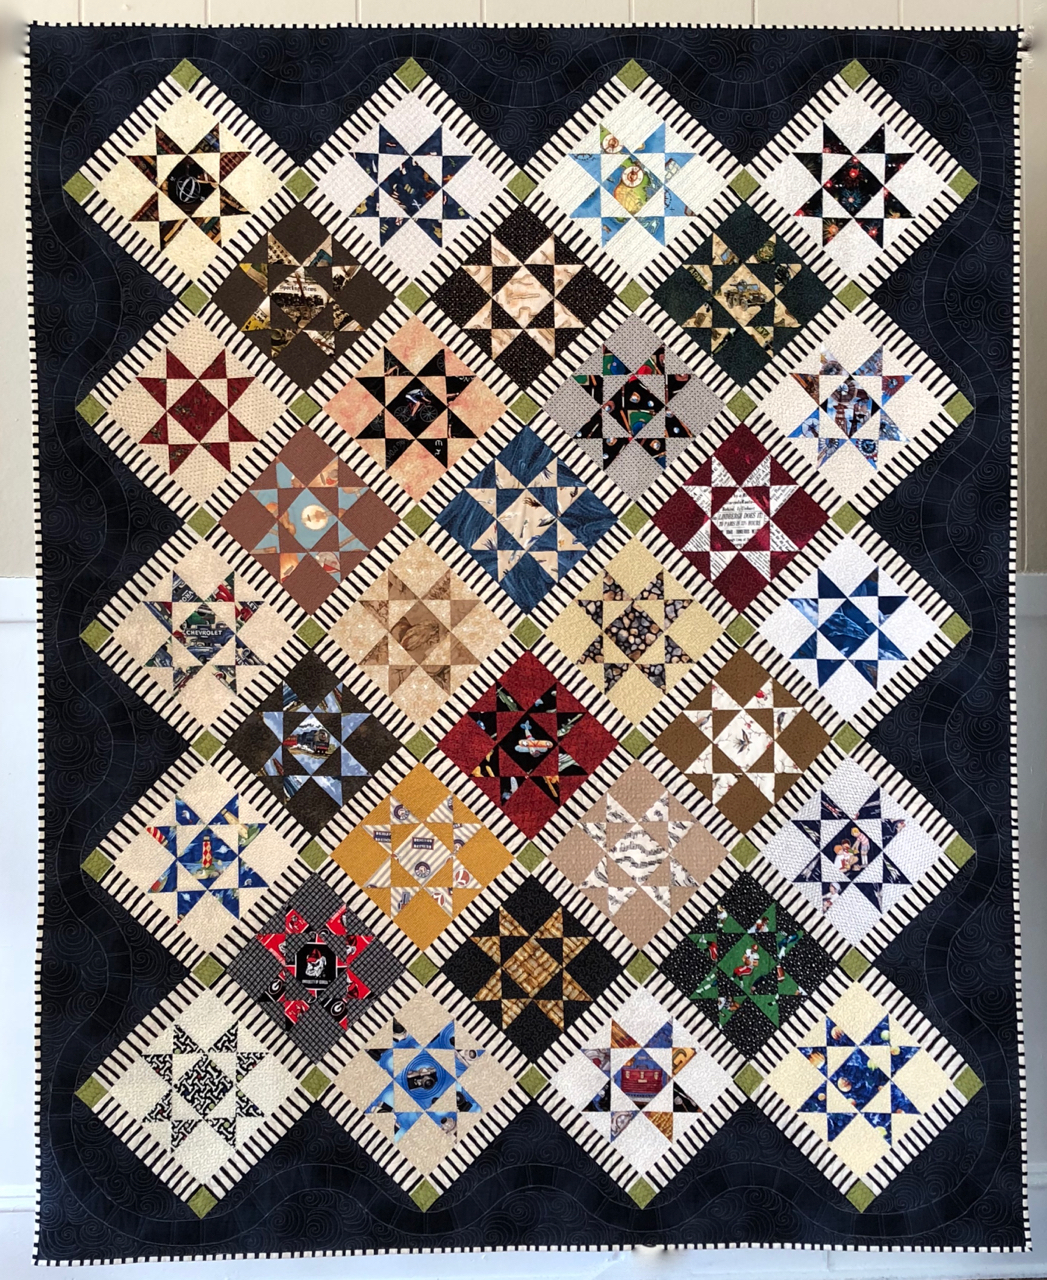
This graphic quilt was oh-so-easy to make.  I used the “pine tree block” within the Tree Farm pattern I designed a few years ago.  By the way, all my patterns are now free.  If I have printed copies available, I will pop one in the mail to you if you ask for one.  Otherwise, I can send a .pdf file to you via email.  Again, free.

This pattern layers three or more fabrics, then you cut them apart following a preprinted pattern on freezer paper, shuffle the fabrics, and reassemble.  The original Tree Farm pattern is more complicated because there are other more involved blocks included, but if you just use the pine tree blocks, it’s a quickie!

I arranged the blocks on the design wall so the blocks having darker backgrounds formed a sort of border.  A quick vine for a quilting design, and this one was done!

I love how the natural light comes though the quilt on the railing.  For this quilt, I chose one of my go-to quick motifs for quilting, a meandering vine and leaves. Normally draped over a chair in our bedroom, this quilt enjoyed the outing.

Check out the publications tab at the top of the page for patterns, including this one.

Fairhope Feedsacks

It was a gray day when we recently visited Fairhope, Alabama, but I had a bit of color in my purse.  Early in my quilting adventures (2003, I think), we visited Fairhope and I saw a log cabin quilt made from reproduction feedsack fabrics.  I came home and started sewing.

When we headed to Fairhope last week, I rolled the little quilt and tucked it into my purse just in case there were any photo ops.

The skies were heavy, so I stopped at the first picket fence with a color-coordinated house behind it, and snapped this view.

In a couple of shops, I saw welcoming vignettes and store owners graciously let me drape the fabric about their merchandise.  It’s amazing what a crazy old woman can get away with if she bothers to ask.

In a tee-shirt shop, I was amazed that they had laid out a display of shirts in just these feedsack colors!

And then, Sailor sauntered by and plopped down for a nap.  He was kind enough to model the quilt, creating a unique spot for Fairhope Feedsacks to rest.

At the pier, pilings and tree roots served as quilt racks.

And, at a candy store, more fences, porch railings, an old dresser, and even a baby carriage, a blue baby carriage, gave the little bit of a quilt a place to perch.

Now I’m looking for places to take some other small quilts.  I love making the little ones.  And since I”m doing it for fun, who cares what size it is?  I know a lot of people think a quilt has to cover a bed.  I’m so glad they are wrong!  

Fairhope Feedsacks measures 19” x 24” .  The logs finish at  3/4” wide.  I probably used Dream cotton request batting and cotton thread.  

Lessons learned from this quilt:  

Washing a quilt gives it a softened aged look instantly.  

I personally don’t like the same fabrics used in the same position in a log cabin (that’s what I did here, giving the double dose of turquoise every time the blocks meet).  I like the colors to be more random, scrappier.

The result, this little piece, was one of my first attempts at free motion quilting.  I used a variegated thread and a simple meandering stitched path.  It’s not complicated, It’s not a competitive piece, but the little quilt is pleasing to hang about the house…or on fence posts, or at the beach, or on a cooperative doggie.

Here is a photo of Fairhope Feedsacks at home, atop the clock in the breakfast room where it hung out all summer with a compatibly colored rooster.  

Seven Black Birds

Seven Black Birds is a quilt that’s been on an outdoor photo shoot and I promised more details of its story – a few months ago.

Later is better than never, so here it is.

My friend Kathleen and I shared a love of needle turn appliqué and wanted to make a large album style quilt, each using the same pattern, but varying the fabrics.  We chose the Friendship’s Garden pattern by Barb Adams and Alma Allen.

We shared the plan with other guild members and soon had 20 or more members each making her own version of this project.  At one of our guild’s quilt shows, nine completed quilts made from this pattern were hung together so that visitors could see how individuals personalized their own creations from one common pattern.

I kept detailed photos of my work in progress, so I can share some of my design process through the story of this quilt.

I found a toile fabric in soft shades of brown for my background.  The country scenes in the toile seemed to fit the mood of the pattern  and I chose rich reds, greens, and browns for the appliqué.


Before I was done, the primitive birds in the pattern had been replaced with more sophisticated ones, and I put a blackbird in every wreath in the design.  The one with the nest and its contents inspired the title.  I love to watch people try to find all seven birds.

I made all the sashing blocks (half-square triangles) the pattern described, but when I put them on the design wall, they seemed to overpower my appliqué.  In this photo, some of those triangles have been stitched together, others are just clinging to the design wall.

I redesigned the sashing in a few different ways, auditioned those, and chose the “on-point” strips of squares.

seven black birds

The original sashing pieces were added to the back, making that construction more complex than the front.  But I love it!  This quilt is often displayed on a ladder in the den, and the back is the side turned “out” as much as the front.  The photo above shows the entire back of the quilt as it was hanging at the Ga National Fair.

I quilted the big assembly (it finished at 84″ square) on my faithful Bernina home machine.  Using a 50-weight, two-ply cotton thread I danced with my sewing machine. (I’ve written many posts describing my free motion quilting technique, and if you put that phrase in the search box on the right side of this page, you will find many references.  Perhaps the  process has been described in the most detail here.)

This quilt was finished in 2009.  The photos are from several cameras, some indoors, some out.  That’s why the colors seem so different.  The earlier post with photos at The Farm House Restaurant is here.

Birds of Amicalola

On a recent visit to a train station and refurbished old store, I took my camera and a quilt.  Birds of Amicalola posed on a bench and in front of the weathered boards of Mildred’s Store.

The quilt is made using the same basket pattern I created for Miss Lily’s Baskets.  In this quilt, I used charm squares of Kaffe fabrics for the appliquéd baskets and Cherrywood hand-dyed blue fabric for the background.  I made a lot of these blocks (I still have quite a few left over for some yet unknown project) before deciding how to assemble them.

I had some bright fabric on hand that had birds flying all about vines and leaves.  Those birds said, “we want to fly amongst those baskets.”  And the leaves seemed perfect for the wreaths in the baskets of the three focus blocks, so I fussy cut the leaves and birds and attached those elements with the invisible basting stitch I had learned from Jude Hill.  When I quilted, I stitched those pieces down with free motion stitching before moving to the background quilting.

The quilt measures  51 ” x   58″ .  The background quilting was done using silk thread (100-weight) on top, two-ply cotton (50 weight) in the bobbin.  The vine in the border is quilted with 30-weight polyester thread.


Photos of this quilt in progress were included in the post here.  Oh, and we were on a trip to Amicalola Falls State Park when I added the birds and leaves to the basket blocks.  That’s the source of the title.


And here is a closeup of the vine stitched on the border.

You can click on any image to enlarge and see details.

An update to include a photo of the entire quilt:

Here it is hanging in our local guild’s show.  The ribbon is for Best Machine Quilting on a Home Machine.

Fern Fronds and Fibonacci


A historic covered bridge seemed the perfect backdrop for a quilt photo shoot.  On a beautiful spring day Jim and I loaded the car with a couple of cameras, a couple of tripods, and a couple of quilts.

This stop was at the Red Oak Covered Bridge near Woodbury (details and a map can be found here: http://www.exploregeorgia.org/listing/476-big-red-oak-covered-bridge).  The quilt you see is my Fern Fronds and Fibonacci quilt, made in 2007.  It finished at   56” x 61” and features a sunprinted image of an Australian Tree Fern (Cyathea cooperi ) which was growing in our backyard garden at the time.

Some of my first explorations into putting images onto cloth were through the process of sunprinting.  This predates the printing, painting, and dyeing I’ve been exploring more recently.

The life size image of the fern frond measures 29“ x 34“.  The turquoise and white blueprinted image needed some color to give the quilt a more spectacular “wow” factor, so I chose to include a variety of brightly colored fabrics in the border.

Many batiks were used, along with some fossil fern prints.  I still love that line of fabric, and continue to use them a lot.  They are soft and loosely woven, but to me this makes them turn easily for appliqué.

To create a unique border, I referred to the Fibonacci sequence – the infinite mathematical sequence 1,1, 2 ,3, 5, 8, 13, 21, 34… .  Each term of the sequence (after the first two) is found by adding the preceeding two terms.  For those of you who want a math review:   t1 = 1, t2 = 1, tn+1 = tn + tn-1.  And the answer to the inevitable test question, “is it arithmetic, geometric, or neither?” can be found at the end of the post.

The Fibonacci sequence is found in the growth pattern and leaf structure of many plants, including ferns. Google will help you with more intense investigation if you want to pursue it.

To interpret this into my quilt, I made colored rectangles all 1” tall, but whose widths were 1”, 1”, 2”, 3”, 5”, etc.  To avoid single loooong bands of color, I did not use a length greater than the 34” (limiting myself by the dimension of the plant image itself), I just repeated that sequence in a spiral until I was satisfied with the look.


The woven ribbon portion of the border was a design taken from one of Sally Collins’ books.

I was very inexperienced with machine quilting at the time and didn’t feel confident stopping and starting at the edge of the design.  So I quilted the grid in the sunprinted space by hand.  Make that read BY HAND.  That pretreated fabric is more closely woven than your normal quilting cotton making this a less than pleasant experience.  I used Dream Cotton batting which is nice and thin and generally easy to quilt through.  But now I know that wool would be sweeter to needle.  I don’t think wool batting was widely available at that time.

Then I dared to freemotion quilt fern fronds in the border space.  I traced a section of the fern, transferred it to the fabric using a lightbox, then stitched with an invisible polyester thread.

As I write this, I am amazed at how much I’ve learned since that experience.  But even though it’s full of what many would see as mistakes; I love this quilt.  I still love the fern.  I love the unique opportunity to combine nature and mathematics in fabric, and I love that I’m still learning things about quilting.

At the time I printed this image, I made many more blueprint images of plants including multiples of this plant.  I love planning ways to include these fabric images in new projects.

Older posts with details of other quilts with sunprinted images are these:

https://sandygilreath.com/gbi-blues/,

https://sandygilreath.com/whats-in-a-name/ (this one had a sunprinted label)

https://sandygilreath.com/annie-maes-lace/

Answer to the math question:  neither.  Arithmetic sequences are generated by adding a fixed constant to one term to get to the next; geometric, by multiplying.  Neither is the case in this sequence.

The black & white photo with color accent is Jim’s darkroom magic.  The other photos are mine.  If you think the fern is blurry, it’s not the camera.  It’s the motion of the fern in the wind during the 15-minute sun exposure.

70 and Still Wearing Jeans


The world’s greatest husband had a birthday.  To celebrate this milestone, I completed a project for him that I had started several years ago.  Yes, it was a project in progress for a while.

I had collected some novelty fabrics and made 9” Ohio Star blocks.  The working title for this project was Things Jim Likes.  Construction stalled when there were some categories that had to be included but were difficult to find.  Fabric with cameras, birds, maps, were some of the most elusive.  I put everything in a box and put it on a shelf until I could collect more fabrics.  By everything, I mean a diagram of the quilt I had designed in EQ7, notes to myself about the possible sashing and setting triangle fabrics, and a list of themes I had and wanted to add.

When I would find fabrics that were appropriate, I added them to the box, and time marched on.


As this birthday approached, I decided that this would be his “three score and ten” gift .  Yes, he walked in the sewing room several times while the blocks were on the design wall.  And, no, he didn’t realize what was there.  I worked as quickly as I could with them on the wall, and I lied a bit (ok, a lot) about what I was doing upstairs in the weeks before Christmas.  (His birthday is December 26 – the design wall photo was taken Sept 23.)

Once assembled, I knew I couldn’t hide it long enough to quilt it myself.  And, it’s big and would take me a long time.  So Dewey Godwin became my partner in secrecy and did the quilting in record time.  Knowing the theme and seeing the trains, Dewey incorporated a railroad track into the border.  Perfect!

While I was working on this, Jim was playing Amanda by Waylon Jennings with a line  “finally made 40 and still wearing jeans.”  There’s where the title came from.  Not 40, but still wearing jeans.


My partner, my assistant, my musician, my photographer, my soulmate now has a new quilt of his own.  And, just in time for the coldest weather in a very long time.  It works at nap time in front of the tv.


Some of the things represented are cameras, lighthouses, scientific instruments, football, windmills, Christmas lights, birds, travel, the great outdoors, banjos, guitars, railroads, geology, the US Army, and even  sharks (those represent the years he taught Oceanography and dissected sharks in his lab, gaining notoriety for the smelliest classroom at school).

The patchwork back is made of fabrics whose motifs wouldn’t fit in the star design, but fit the theme.


For email subscribers, here is a photo of the whole quilt.  It measures 65″ x 80″ .  For more detail, go to the website and click on any photo to enlarge.

Challenging Quilting

seasquared-mouthOur guild’s challenge quilt is due in three weeks.  It’s secret until then, so I can’t show photos of it now, but I can say I’m excited about what I’m doing.  Tess, our Challenge Queen, gives us the annual specifications in February with the deadline being our November meeting.  I typically think about it, research photos and patterns, basically collecting thoughts until October or so when I have no choice but to make something.

There are years when I’ve started early, but I often aborted the first plan. There have been exceptions; occasions when I started earlier than usual, stayed focused on a project that took a lot of time, and brought it to completion ahead of schedule.  But several have been done the week before the due date.

On the single occasion when I completed the project early, I really disliked the quilt and abandoned the idea of using it as my entry. The challenge in 2013 was “ Dare to be Square” or something like that.  Tess always comes up with catchy titles.  The rule was that the quilt must be pieced (no appliqué!) and every piece must be a square. In October, I sprang into panic mode, grabbed a half-yard cut of a bold fish print by Brandon Mably, some hand-dyed fabrics of similar colors, and started cutting squares.

seasquared-whole-quiltI cut the largest square I could from the focus print (20” finished. (I know – it must have been a generous half-yard cut)), then cut smaller squares from the fish fabric and the others.  20” finished was a nice measure to use as the reference.  It was easy to patch together units using 1”, 2”, 4”, 5”, 10” components.

seasquared-fishesAs the project grew on the design wall, I had fun finishing a fish.  Where one had been cut off, I could find missing components of that fellow somewhere else in the smaller squares and place it close by to make his image extend into the other spaces.  I even discovered a batik striped fabric that mimicked the background of Mably’s fish and inserted that.

seasquared-starfishAs the “squarequarium” grew on my design wall, I began imagining quilting lines.  I could stitch even more of the missing parts of fish bodies, add bubbles in the water, and enhance fish fins and tails.  Oh, my, how fun was that?

seasquared-octopusI sewed quickly to get the piecing done, layered it with cotton batting, and began dancing with my sewing machine.  I used some heavy threads on some of the solid spaces, enjoyed stitching lots of free-motion quilting motifs, and especially enjoyed adding the octopus and starfish.

Even after all that, things looked a little “flat”.  Eyes.  Fish have prominent eyes.  So out came the wool, a circle cutter, some buttons, and voila!

seasquared-backA solid blue fabric on the back made the stitching details noticeable. Susan said she liked the back of this quilt better than the front.  So for her next birthday, I stitched a fish on blue fabric for her beach house.

This quilt does not contain colors in my house or colors I particularly enjoy using in a quilt.  But I love this finished product because seeing it reminds me how much fun a challenge can be.

I called this finished project “Sea Squared.”  Some of my math colleagues will notice the reference to a  project we worked on for years. The finished size is 40” x 34”.

This year the challenge requires at least three fan blocks, and some yellow fabric.  The finished size is prescribed this time: 36” square.  My first reaction was “I’m not a fan of the fan block,” but in my research I’ve certainly learned a lot about those historic blocks and their reinterpretations through the years.  As a friend said yesterday, “I love our challenges.  They force us to think about things differently.”  Indeed.

Update:  A later post revealed my entry in the fan block challenge.  It is here.

Never Say Never or Dye

prewashing fabricsToday I find myself doing two things I thought I wasn’t doing anymore.  Prewashing fabric, and dyeing fabric.

Once upon a time, I prewashed all my commercial quilt fabric.  I loved seeing the colors up close at the ironing board, I found myself reshuffling fabrics to make new groupings as they hung on a rack to dry, and I planned all kinds of projects during that stage of the process.  Lately, though, I’ve enjoyed piecing with the crisp fabrics as they came home from the store.  And, I enjoyed having the time spent sewing rather than washing and ironing.  I do only buy quilt shop quality fabrics and haven’t had a problem with colors bleeding.  Well, I have had one problem red fabric, but it was a top quality brand, and it had been prewashed.  So, there is that.

I’ve lately bought some vintage linens that were heavily starched and I didn’t want the bugs to attack.  Recently I’ve been doing a lot of hand stitching, exploring more of Jude Hill’s techniques, and like touching the soft rumpled linen and cotton in that process.  I wanted to use some Irish linen handkerchiefs I recently bought which had never been used (I removed the Rich’s label before throwing them in the washer) and wanted to be sure the creases were not yet holes.

mb wool with snailAnd, last week I stitched the wool piece you see here from a Maggie Bonanomi pattern.  I was anxious to work up another one of her pieces, and grabbed a piece of silk matka for the background of the next piece.  To complete the load, I added a few pieces of Japanese woven fabrics I had bought in Paducah.  They needed softening a bit, too.

Maybe dyeing isn’t the right word to describe the process you see in the bowl.  Staining might be more like it.  Some of the fabrics I’ve been working with lately are a bit too WHITE for my taste.  And, I had this set of blue linen napkins that I’ve been working with and wondered what I could do to give them some visual interest.  Yes, the weave is nice.  The color is nice.  It’s just a bit flat.  And, I admit to being spoiled by using hand-dyed fabrics; I’ve gotten accustomed to their subtle variations.  blackberry dyeingSo, I had some blackberries we weren’t eating as fast as we should, I boiled them with some water in the microwave, and added some fabrics.  If you think you see bits of berries in the bowl, you are right.  I’m hoping for a mottled effect.

I love hand-dyed fabrics.  I’ve said that before.  But I don’t like the chemical nature of synthetic dyes and the equipment needed to dye my own fabric.  However, I have recently embraced watercolors on fabric and like to alter the color a bit myself.  So, natural recoloring might be something I can do with rust and berries and nuts and dirt.  Think of it as a country girl’s approach to hand-dyes.

Stay tuned for the outcome.

Piecing Pleasures

featherweightToday was a day with much time on the phone and on the computer.  Arranging details for upcoming events, paying bills, scheduling things.  Frustrating all.

And, seemingly accomplishing nothing.

But then I went into my sewing room for an hour or so.  I cut up some fabric and sewed it back together.  Now I’m myself again.

It was a simple design…one I’ve done before, but just refining the size of the block for another project.  But the pressing of the fabric, the slicing with a sharp rotary cutter, the sewing back together again, the hum of the machine.  Is there anyone who doesn’t find this process comforting?

I know, there are people who break out in hives just hearing about this.  But those are people who like to clean house and pull weeds, I think.  I love to sew!

I think I should reiterate that I was using a really simple forgiving pattern that does not involve matching intersections or tedious measuring.  Though those kinds of projects are rewarding too, today I needed improvisational bliss!  I oversized the pieces, sewed with a casual seam allowance, and trimmed to fit.  Pure pleasure!

The Peddler’s Quilt

Mr. GlazeThis gentleman is Mr. Luther Glaze, a peddler who sold fabric to my husband’s grandmother, Zelema, in the 1920’s and 30’s. Once a week, Mr. Glaze arrived  in his truck, his wares protected with a canvas cover.  “Granny Zee” never paid him with money, but with butter and eggs from her farm.

"Sadie Belle's Scrap Baskets", 2007. Made from scraps from my mother-in-law's mother's fabrics. Zelma Carter bought these from a peddler, Luther Glaze. She never paid cash, but paid him with butter and eggs. All fabrics except the white bacground came from her 1930's stash.


The quilt here, “Granny Zee’s Scrap Baskets,” is one I made in 2007 using fabrics left from some of Zee’s sewing.  Her daughter, Sadie Belle, was my mother-in-law.  In her twilight years, Ms. Sadie found a large bag of scraps and offered them to me to “use in a quilt.”  I washed, ironed, and sorted some 69 different prints.  Many of them were from feedsacks, some were fabrics Ms. Sadie recognized as being a school dress for her or an apron for her mother.  The remnants I had were often the negative space that resulted from cutting pieces for clothing; a shirt front, a sleeve, a collar from a child’s dress.

I delighted in the fabrics and thought egg baskets to be an appropriate block.  Using a solid white fabric as the background, I pieced the entire quilt using Zee’s scraps.  I made a wall hanging and worked quickly to complete the quilt, knowing Ms. Sadie’s memory was fading every day.  She treasured it and shared memories from the fabrics every time we looked at it together.

Sitting on Mama G's back porch with her and stitching on her quilt.

Ms. Sadie had some moments of anxiety and anger with her dementia, but my sewing basket seemed to calm her.  As it always calms me.

One might question, as I did, why the family had a framed photo of the peddler.  Asked, but not answered.