Princess Priscilla

I looked up from the sewing machine and saw another heart on the wall. I hadn’t exactly forgotten this one, but she is old.

I made her in 2005 in answer to a challenge at my local guild. Tess, our Challenge Queen, had directed us to make a quilt including hearts. A great idea since we are the Heart of Georgia Quilt Guild.

I was new to the world of quilting and to the challenge notion. This was my second opportunity to enter that competition and appliqué was the newest tool in my toolbox.

The pattern came from a book by Robyn Pandolph and many of the fabrics I used came from her designs, as well. Those were the days when I used fabric from one collection. And followed a pattern. As already stated, I was new at this quilting thing.

New at giving titles, too. I named this one Princess Priscilla loves Paisley.

Well, I sorta followed the pattern. I remember the challenge specified hearts, plural, so I added the hearts in the border. They are low contrast (I love that touch of subtle in a quilt) and asymmetrically placed. (Oh, how I love that!)

And the doll nestled among all those quilts is just one I had to bring home with me a few years ago. She’s happy bouncing around the house posing on quilts.

Speaking of posing, Priscilla went to Tifton recently and posed in front of Plough Gallery there. Don’t you just LOVE these blue doors? And, the hexagons in the paving on the walkway?

And the art in the gallery is nice, too! More stories from this place to come.

Hearts and Ribbons

This is the month to see hearts everywhere, and I LOVE it!

Hearts have long been one of my favorite motifs and they often show up in my quilts.  My quilt guild, (Heart of Georgia is its name – coincidence you think?) has themes for some of our Show and Tell sessions this year.  

We always bring new quilts we’ve recently finished, but the themes let us revisit favorite old quilts that we haven’t shared in a while.  Show and Tell is always inspiring and this variation allows new members to our group to see some past works they missed.

So I’ve been thinking about hearts in older quilts of mine, looking around the house at older pieces.  

One I found was this one Hearts and Ribbons– a project I made in the first appliqué class I took. Anita Shackelford was the teacher.   An excellent designer and teacher, she guided me through the intricacies of needle turn appliqué.   Though some of my work is more casual these days, I owe her all the credit for my beginning stitches in this technique.  

This piece features hearts that were made and stuffed, then hand quilted.  Later, they were attached to the background including other appliquéd elements.

The stuffed berries and delicate embroidery just add to the rich details of the piece.

This was one of my first efforts at free motion machine quilting, too.  I think I used an invisible thread and cotton batting.  

I don’t suppose anyone is surprised that the featured color here is blue.

Miss Nellie’s Country Garden

On a recent Saturday ride-about, we took a big wool quilt in case we saw a spot for photos.  We found a spot at Starr’s Mill, and gave Miss Nellie’s Country Garden some places to pose.

The quilt is my version of a pattern from Lisa Bongean of Primitive Gatherings.  The wool appliqué is stitched by hand onto cotton background fabrics.  The piecing together of the blocks and the quilting are done by machine.  

As I worked on all aspects of this quilt, I thought of my Aunt Nellie.  The wool appliqué – informal and free – and the garden theme led me to know the quilt had to be named for her.

She was known as Miss Nellie to most everyone in the community.  I was lucky enough to know her as Aunt Nellie.  She was a teacher, and so there are some people who knew her as Miss Hobby, too.  She lived next door for my entire childhood, and serves to inspire me every day of my life. 

She lived to the age of 91, and only in her 91st year was she unable to tend her garden.  She grew vegetables to eat, to share, to can, and to freeze.  She grew flowers for the joy of the bloom.

Aunt Nellie’s vegetable garden was neat and orderly, but her flowers were a riot of stems and leaves and blooms.  Weeds were kept at bay in both places, but the separation she maintained in her butterbeans and squash was not valued in her flowerbeds.  The snapdragons and pansies, the petunias and lilies and gladiolas all mingled about, with her snipping a cutting here and poking it in an empty spot there to take root and fill a space.  And, take root they did.  Her green thumb was legendary, possibly due in part by the load of fresh cow manure a local farmer delivered to her every spring.

She grew geraniums in pots, dahlias in a  separate bed all their own.  She had a bit of yard art, too.  I remember a whimsical bird bath, tiers of porcelain basins given to her by a friend.  Once it developed leaks, it was repurposed as a planter for succulents.


So the whimsical nature of some of these quilt blocks is a perfect tribute to a woman from the country.  The label is a block I had made because Miss Jump, one of Linda Brannock’s creations, reminds me of Aunt Nellie.

More quilt details:  The quilt finished at 60” x 75”.  I used a whipstitch to secure the wool to the cotton, usually with perle cotton thread, but sometimes with embroidery floss or even fine sewing thread.  The quilting is all hand-guided freemotion stitching on my home machine.  I used Dream Cotton Request batting and a cotton fabric for the background.  And it was all fun!  Just as Aunt Nellie would have wanted it to be.

Oh, and another detail.  Because the wool is so visually heavy, I made a wider binding than I usually do.  The “standard” 1/4” binding seems so wimpy on a large wool quilt, so I cut the binding 3 1/2”, then folded in half and stitched it to the front of the quilt with a hearty 3/8” seam allowance (or scant 1/2”).  The binding then finishes (with these fabrics) at 1/2”. I used a woven plaid (easy to stitch down by hand) and cut it on the bias.

More about Aunt Nellie:  I’ve written a lot about Aunt Nellie already, if you type “Nellie” in the search box, you’ll find several references to her.  But, she is the older of the two “Spinster Sisters” in this post, where I shared more details of her: https://sandygilreath.com/spinster-sisters/

Remember Me

In our household, we often quote favorite movie lines to convey a big message in a few words.  A bit like a secret language, the power of a select phrase can convey a sense of place, a mood,  or a personality,  and add to the bond of family.

One phrase that’s part of our oft-repeated mantras is “remember me?” spoken in the tone Julia Roberts used in Pretty Woman.  You know the scene when she returns to the uppity sales clerk who had refused to help her.   Laden with packages from another Rodeo Drive shop, she twirls about and smugly displays her loot.  There’s a follow-up line about working on commission and “Big Mistake.”  We quote that sometimes, too.

Several years ago, when I was a member of a mini-group of quilters who called ourselves The Basket Cases, we exchanged blocks to make quilts.  The rules were: make a 9” basket for each other member of the group, in the color specified by each gal; then make your own quilt with the result.  I chose blue (big surprise), as did Mary.  Susan asked for red and pink.  Dale requested pastels, and Angie’s color was terra cotta.


The single basket block you see here is from one set of blocks I made to exchange.  The others I made for them were similar, but with pieced bows at the top, not appliquéd bows like these.  I made some of that type in blue for myself, too.

We made the exchange baskets twice and each assembled her own quilt using whatever setting was desired. I had eight baskets from friends (you can find four pairs of similar baskets in my quilt, each pair from one quilting sister) and four I had made.

I struggled with the various shades of blue and the different levels of contrast until I remembered how I love brown with blue.  This dark brown polka dot seemed to be the perfect fabric to enclose the group of baskets and serve as a border.  

I tried the polka dot as alternate blocks, but the big blocks of color were distracting.  So back to the sewing machine.  I made six 7” basket blocks, framed them with 1” borders of the brown which acted as sashing, and was done.

So it was time for a title.  The brown polka dots reminded me of a dress Julia Roberts wore at the polo match in Pretty Woman.  So, Remember Me was the perfect phrase to convey the movie connection and the spirit of the exchange blocks with the Basket Cases.

The photos of the quilt were made on an outing to Auchumpkee Creek.  Jim made some photos, I made others.


In this photo, you see the back of the quilt with a tree’s shadow on it.  As I often do, I pieced the backing with several blue fabrics.

I did not do the quilting on this one.  My friend and longarm expert, Kathy Darley, did a great job putting the layers together.

Shade Tree Mechanics

Life imitates art.

On a recent adventure to a pottery festival, I saw this beautiful 1953 Chevrolet truck.  It was a glorious blue, beautifully restored, and photogenic from all angles.  But my favorite angle was this one because it mimicked the truck I put on a quilt a few years ago.


In 2015, when pondering a design for a raffle quilt for my husband’s local Vintage Chevrolet Club chapter, I decided to create a scene where men might tinker on their machines. I love including trees on quilts, so the title was easy 

The quilt measures 44” x 70“ and is a combination of needleturn appliqué, raw-edge appliqué, hand-guided freemotion quilting, trapunto, and printing on fabric.

I drew the design on acetate transparency and using my vintage overhead projector, enlarged the image to fill the background fabric pinned to my design wall.  The same technique was used to draw the freezer paper templates for the tree trunks and the various pieces of the truck.  I used commercial fabric to build the images, working from background to foreground as I attached the pieces.


I posted these photos to Facebook as I worked and it triggered many memories my students in math classrooms in days gone by.


The quilt top on the design wall before quilting began.


Wool batting was layered underneath the Chevrolet emblem on the tailgate, stitched down with water soluble thread.  Then the excess batting was cut away before layering the entire top on a cotton batting.

Freemotion stitching made the layers become one, a quilt.  In addition, that stitching was used to differentiate areas of the dashboard, windshield, and tire tracks on the ground.  Freemotion stitching was used to attach the raw-edged leaves as well. 

A photo of an antique car tag was scaled to fit the license plate space and printed onto fabric.  Blue was chosen for the 1953 model truck because there is such a truck in Jim’s family.  And blue…well, it’s blue.

A bowtie-shaped Chevrolet icon served as the basis for the handwritten label.  Sadly, I don’t seem to have a photo of that.

Note:  One purpose in writing this blog is to record details of quilts I’ve made.  I had written most of these details in a draft a couple of years ago, but the photo of a real truck like the one I fabricated spurred the post to publication.  As I read the details I had written, I was reminded how important it is to write things down.  I had forgotten the details of the wool batting layer, raw edged leaves, and thread choices.  

Especially since the quilt is no longer in my possession, the written description of the process is more valuable in case I want to do something similar again.

Another note: Many of these photos were made with an older iPhone and poor lighting conditions.  Reducing them to post online makes for even poorer quality, but clicking on the image to enlarge it may reveal some details you miss in the original.

Blue and White and Red

Quick, answer this question:  “What is Sandy’s favorite color?” 

That line brought a big chuckle when I recently asked it at a presentation I was giving.

It’s a little obvious when my work is collected together.


But sometimes I like to add a bit of red and white to the blue, as I did in this piece that’s next on my list of “ready to quilt.”  

I’ve mentioned before that I like to work seasonally.  So a small project I made this year as July 4 approached was this one called Stars in Bloom.  The pattern came from Blackbird Designs, and I interpreted it in cotton and wool. 

The rich red flower petals are various reds from my wool stash, the most prominent being from that red cashmere coat I bought a few years ago.  The vines and leaves and blue stars are cotton fabrics.


I certainly want the quilt label to be unique.  It’s important to include a label identifying the quilt title, the maker, the date.  A simple rectangular piece of cloth containing this information is better than nothing, but since I began quiltmaking, I’ve enjoyed including elements of the quilt’s design in the label.

Ollie Jane’s Flower Garden has a lily similar to the one on the front of the quilt as its label.  Walker’s Pasture has a miniature photo of the front of the quilt on the label.  Mom and Apple Pie’s label features a flag (an appliqué element from the front – and the label you see at the right).

That said, I may have gone a bit overboard in this small piece.  The combination of hearts and stars on the front led me to include a heart and a star.  It took a big star (well, big relevant to the size of the quilt) to contain the title and my name.  Then an even bigger heart was needed to surround the star. Above, the view of the backside.  Do you think the label is visible?

As has become my custom, I embraced the raw edge on this label.  The star was machine stitched to the heart, then the heart was attached using the “glue stitch” I learned from Jude Hill, hand stitching the label through the quilt back and batting.  As time goes on, the raw edges will fray more, adding to the charm of the back.  Or to the tattered look, depending on your perspective.

More about Stars in Bloom:  This piece finishes at 12” x 17”.  The appliqué is a combination of wool and cotton.  The cotton pieces are hand stitched needle-turn appliqué.  Some hearts are made of felted wool and stitched down with a whip stitch, again by hand.  The quilting is free-motion machine stitching (incorporating some hearts in the design) using silk thread on top and cotton thread in the bobbin.

Backsides


I like backsides.  When I’m doing street photography, I often focus on images of people from the rear.  Maybe that’s because I think the result is more likely to convey a universal truth than if the face is there; identifying the individual as, well, an individual.


With quilts, too, I like the backsides to be interesting compositions.  The expected traditional way to back a quilt is to use yardage of one fabric.  I admit I do that sometimes.  But most often when I do that, I find the result to be boring to me.

I often piece the backs of my quilts, especially the large ones.  The blue “wonky star” above is on the back of GBI Blues.  I included lots of my favorite blue fabrics that hadn’t found a home on the front.  In 70 and Still Wearing Jeans, I used pieces of fabrics collected for Jim’s quilt where the images were too large to include in the stars on the front.

In Seven Black Birds, I incorporated the discarded half-square triangles created for the sashing in the back.  That quilt hangs on a ladder in the den and more often than not, the “back” side is what is turned out to the viewer.  That’s the quilt here on the hayrack and bicycle.

Sometimes I have fabric that I don’t want to cut up into little pieces for use on the front of the quilt, so I use a whole piece of it as the back of something.  That way I can leave the piece as a whole unit. The toile piece in the photo above is on the back of Blue Tumbling Blocks, a small wall hanging described here.   I recently wrote about Linen Baskets in which I did the same thing with a fabulous Jane Sassaman print.

My most recent piecing effort was inspired by a piece of fabric I’ve had in my stash for many years.  I just didn’t want to cut it up.  So a pattern involving books (paper foundation pieced) seemed perfect for the front of a quilt with the “reading” fabric on the back.  So, it’s true.  I designed a quilt with the back planned first.  Here is a photo of the backing fabric folded on top of the pieced top.  More details and photos will follow when the quilting is done.

Seven Black Birds

Seven Black Birds is a quilt that’s been on an outdoor photo shoot and I promised more details of its story – a few months ago.

Later is better than never, so here it is.

My friend Kathleen and I shared a love of needle turn appliqué and wanted to make a large album style quilt, each using the same pattern, but varying the fabrics.  We chose the Friendship’s Garden pattern by Barb Adams and Alma Allen.

We shared the plan with other guild members and soon had 20 or more members each making her own version of this project.  At one of our guild’s quilt shows, nine completed quilts made from this pattern were hung together so that visitors could see how individuals personalized their own creations from one common pattern.

I kept detailed photos of my work in progress, so I can share some of my design process through the story of this quilt.

I found a toile fabric in soft shades of brown for my background.  The country scenes in the toile seemed to fit the mood of the pattern  and I chose rich reds, greens, and browns for the appliqué.


Before I was done, the primitive birds in the pattern had been replaced with more sophisticated ones, and I put a blackbird in every wreath in the design.  The one with the nest and its contents inspired the title.  I love to watch people try to find all seven birds.

I made all the sashing blocks (half-square triangles) the pattern described, but when I put them on the design wall, they seemed to overpower my appliqué.  In this photo, some of those triangles have been stitched together, others are just clinging to the design wall.

I redesigned the sashing in a few different ways, auditioned those, and chose the “on-point” strips of squares.

seven black birds

The original sashing pieces were added to the back, making that construction more complex than the front.  But I love it!  This quilt is often displayed on a ladder in the den, and the back is the side turned “out” as much as the front.  The photo above shows the entire back of the quilt as it was hanging at the Ga National Fair.

I quilted the big assembly (it finished at 84″ square) on my faithful Bernina home machine.  Using a 50-weight, two-ply cotton thread I danced with my sewing machine. (I’ve written many posts describing my free motion quilting technique, and if you put that phrase in the search box on the right side of this page, you will find many references.  Perhaps the  process has been described in the most detail here.)

This quilt was finished in 2009.  The photos are from several cameras, some indoors, some out.  That’s why the colors seem so different.  The earlier post with photos at The Farm House Restaurant is here.

Birds of Amicalola

On a recent visit to a train station and refurbished old store, I took my camera and a quilt.  Birds of Amicalola posed on a bench and in front of the weathered boards of Mildred’s Store.

The quilt is made using the same basket pattern I created for Miss Lily’s Baskets.  In this quilt, I used charm squares of Kaffe fabrics for the appliquéd baskets and Cherrywood hand-dyed blue fabric for the background.  I made a lot of these blocks (I still have quite a few left over for some yet unknown project) before deciding how to assemble them.

I had some bright fabric on hand that had birds flying all about vines and leaves.  Those birds said, “we want to fly amongst those baskets.”  And the leaves seemed perfect for the wreaths in the baskets of the three focus blocks, so I fussy cut the leaves and birds and attached those elements with the invisible basting stitch I had learned from Jude Hill.  When I quilted, I stitched those pieces down with free motion stitching before moving to the background quilting.

The quilt measures  51 ” x   58″ .  The background quilting was done using silk thread (100-weight) on top, two-ply cotton (50 weight) in the bobbin.  The vine in the border is quilted with 30-weight polyester thread.


Photos of this quilt in progress were included in the post here.  Oh, and we were on a trip to Amicalola Falls State Park when I added the birds and leaves to the basket blocks.  That’s the source of the title.


And here is a closeup of the vine stitched on the border.

You can click on any image to enlarge and see details.

An update to include a photo of the entire quilt:

Here it is hanging in our local guild’s show.  The ribbon is for Best Machine Quilting on a Home Machine.

Fern Fronds and Fibonacci


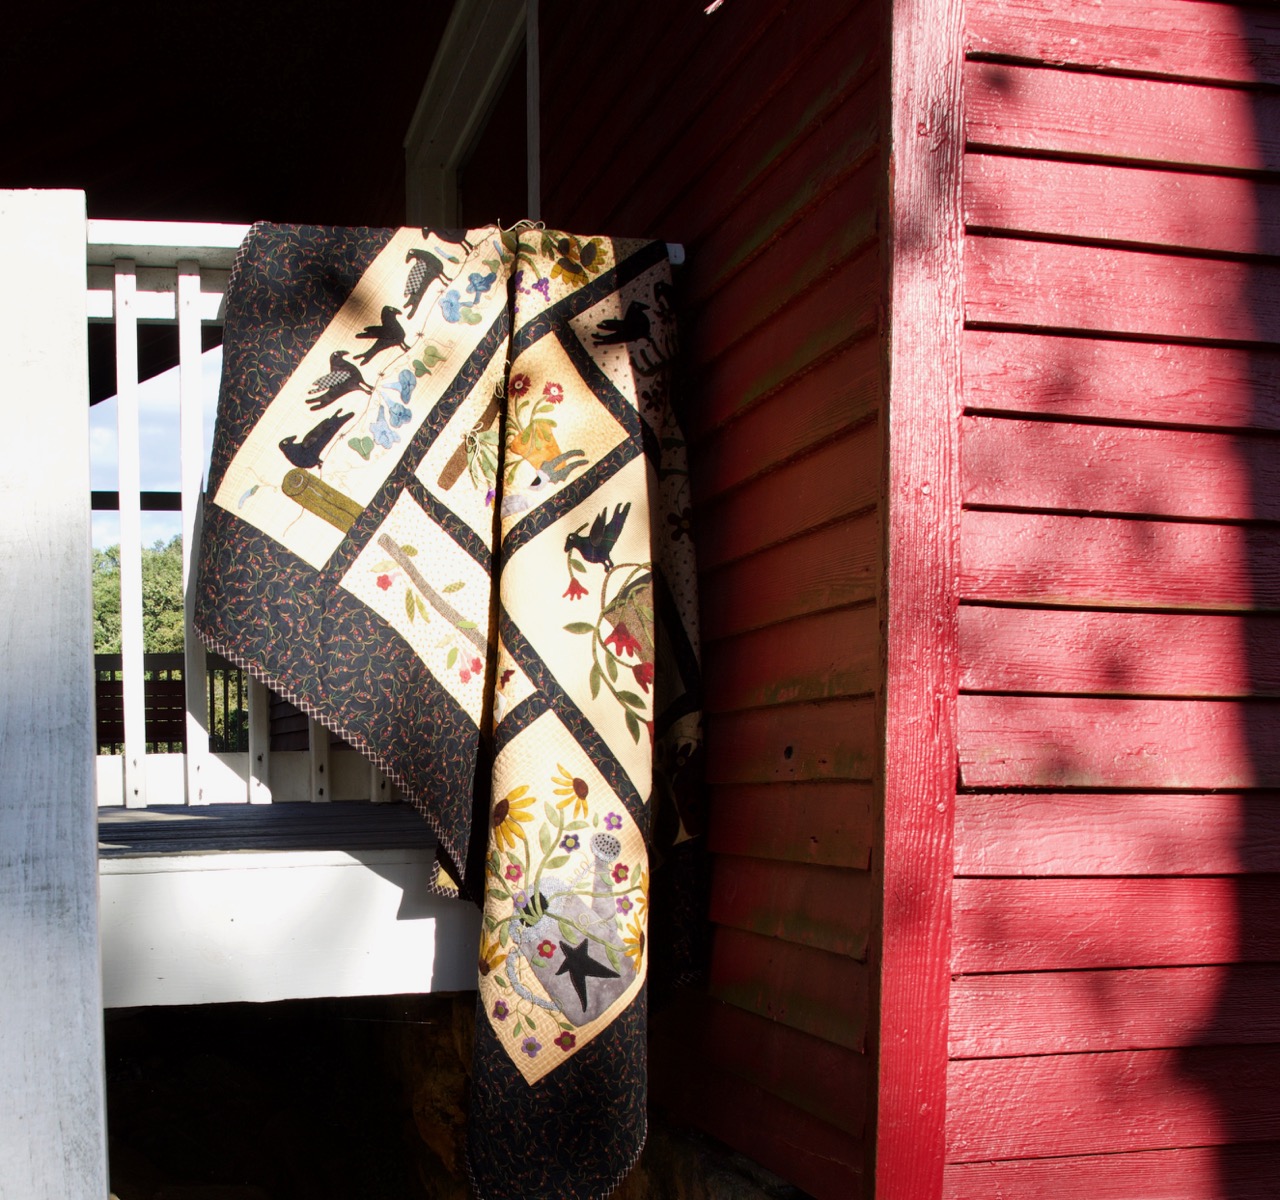
A historic covered bridge seemed the perfect backdrop for a quilt photo shoot.  On a beautiful spring day Jim and I loaded the car with a couple of cameras, a couple of tripods, and a couple of quilts.

This stop was at the Red Oak Covered Bridge near Woodbury (details and a map can be found here: http://www.exploregeorgia.org/listing/476-big-red-oak-covered-bridge).  The quilt you see is my Fern Fronds and Fibonacci quilt, made in 2007.  It finished at   56” x 61” and features a sunprinted image of an Australian Tree Fern (Cyathea cooperi ) which was growing in our backyard garden at the time.

Some of my first explorations into putting images onto cloth were through the process of sunprinting.  This predates the printing, painting, and dyeing I’ve been exploring more recently.

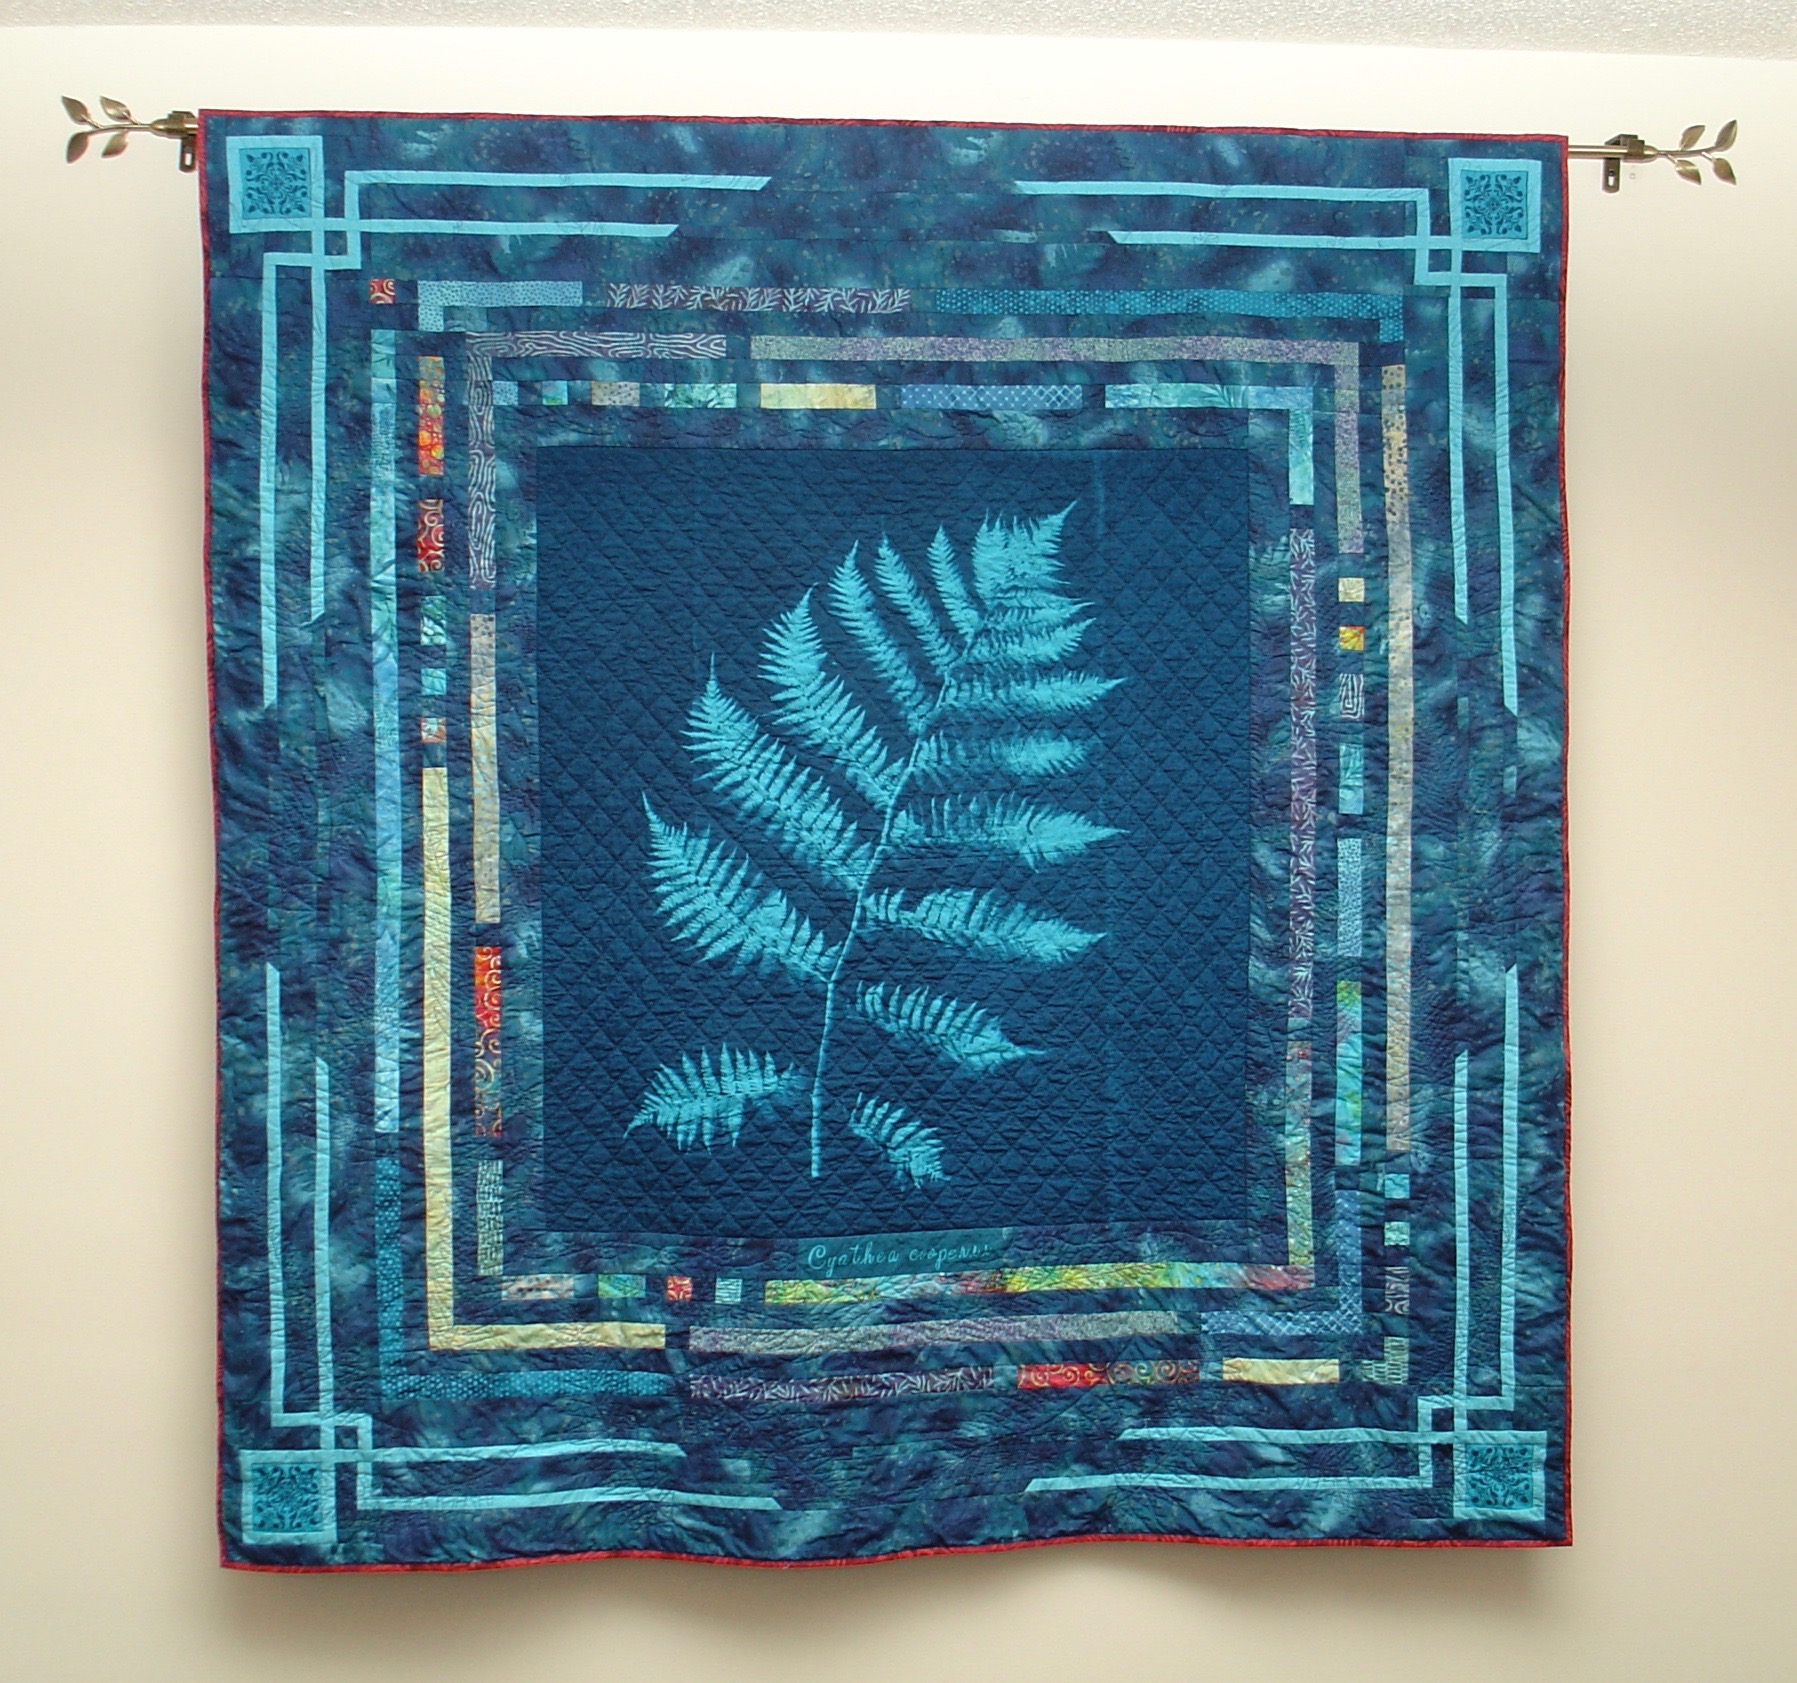
The life size image of the fern frond measures 29“ x 34“.  The turquoise and white blueprinted image needed some color to give the quilt a more spectacular “wow” factor, so I chose to include a variety of brightly colored fabrics in the border.

Many batiks were used, along with some fossil fern prints.  I still love that line of fabric, and continue to use them a lot.  They are soft and loosely woven, but to me this makes them turn easily for appliqué.

To create a unique border, I referred to the Fibonacci sequence – the infinite mathematical sequence 1,1, 2 ,3, 5, 8, 13, 21, 34… .  Each term of the sequence (after the first two) is found by adding the preceeding two terms.  For those of you who want a math review:   t1 = 1, t2 = 1, tn+1 = tn + tn-1.  And the answer to the inevitable test question, “is it arithmetic, geometric, or neither?” can be found at the end of the post.

The Fibonacci sequence is found in the growth pattern and leaf structure of many plants, including ferns. Google will help you with more intense investigation if you want to pursue it.

To interpret this into my quilt, I made colored rectangles all 1” tall, but whose widths were 1”, 1”, 2”, 3”, 5”, etc.  To avoid single loooong bands of color, I did not use a length greater than the 34” (limiting myself by the dimension of the plant image itself), I just repeated that sequence in a spiral until I was satisfied with the look.


The woven ribbon portion of the border was a design taken from one of Sally Collins’ books.

I was very inexperienced with machine quilting at the time and didn’t feel confident stopping and starting at the edge of the design.  So I quilted the grid in the sunprinted space by hand.  Make that read BY HAND.  That pretreated fabric is more closely woven than your normal quilting cotton making this a less than pleasant experience.  I used Dream Cotton batting which is nice and thin and generally easy to quilt through.  But now I know that wool would be sweeter to needle.  I don’t think wool batting was widely available at that time.

Then I dared to freemotion quilt fern fronds in the border space.  I traced a section of the fern, transferred it to the fabric using a lightbox, then stitched with an invisible polyester thread.

As I write this, I am amazed at how much I’ve learned since that experience.  But even though it’s full of what many would see as mistakes; I love this quilt.  I still love the fern.  I love the unique opportunity to combine nature and mathematics in fabric, and I love that I’m still learning things about quilting.

At the time I printed this image, I made many more blueprint images of plants including multiples of this plant.  I love planning ways to include these fabric images in new projects.

Older posts with details of other quilts with sunprinted images are these:

https://sandygilreath.com/gbi-blues/,

https://sandygilreath.com/whats-in-a-name/ (this one had a sunprinted label)

https://sandygilreath.com/annie-maes-lace/

Answer to the math question:  neither.  Arithmetic sequences are generated by adding a fixed constant to one term to get to the next; geometric, by multiplying.  Neither is the case in this sequence.

The black & white photo with color accent is Jim’s darkroom magic.  The other photos are mine.  If you think the fern is blurry, it’s not the camera.  It’s the motion of the fern in the wind during the 15-minute sun exposure.