Seven Black Birds

Seven Black Birds is a quilt that’s been on an outdoor photo shoot and I promised more details of its story – a few months ago.

Later is better than never, so here it is.

My friend Kathleen and I shared a love of needle turn appliqué and wanted to make a large album style quilt, each using the same pattern, but varying the fabrics.  We chose the Friendship’s Garden pattern by Barb Adams and Alma Allen.

We shared the plan with other guild members and soon had 20 or more members each making her own version of this project.  At one of our guild’s quilt shows, nine completed quilts made from this pattern were hung together so that visitors could see how individuals personalized their own creations from one common pattern.

I kept detailed photos of my work in progress, so I can share some of my design process through the story of this quilt.

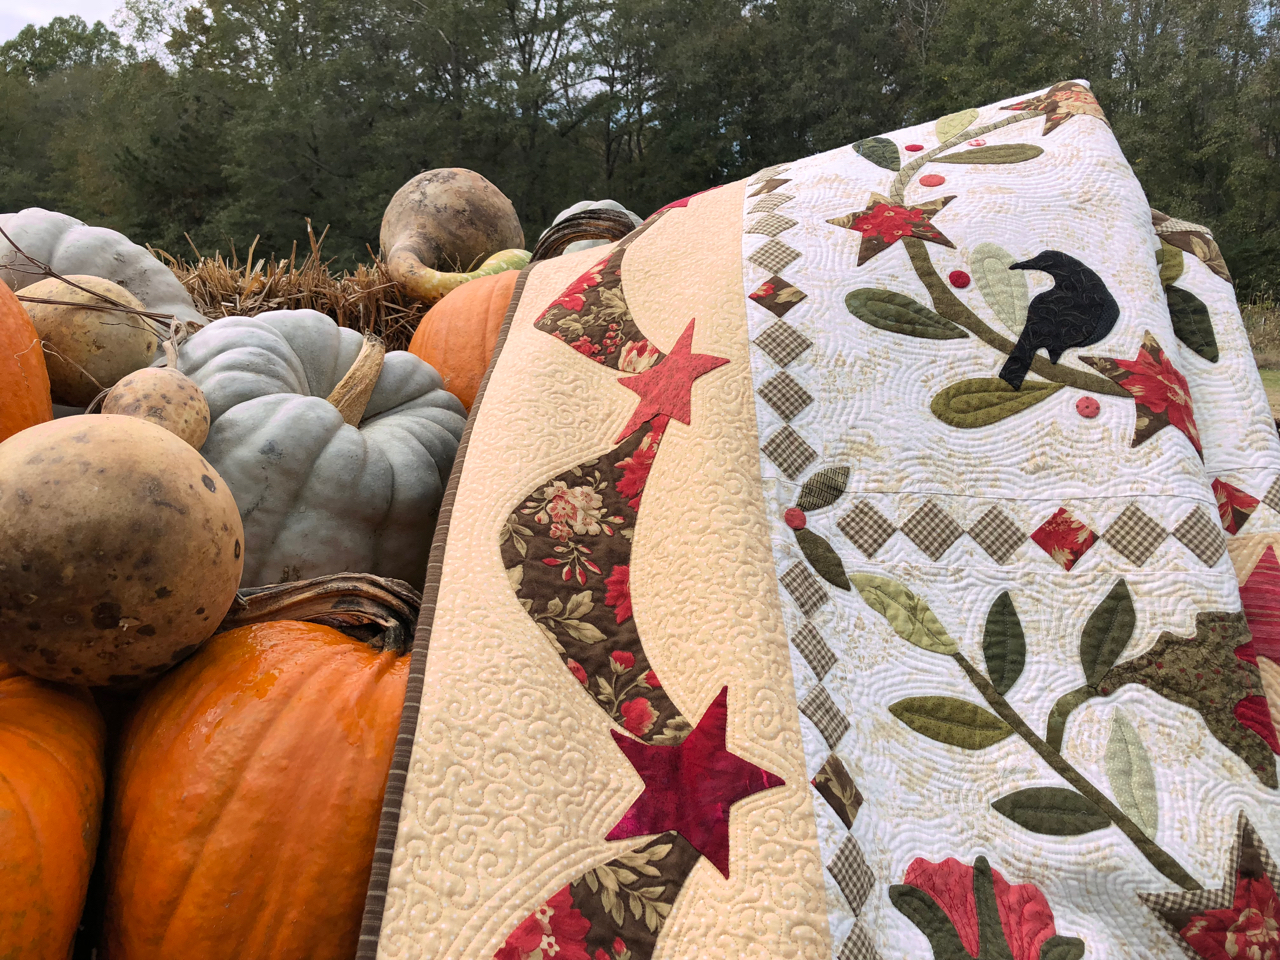
I found a toile fabric in soft shades of brown for my background.  The country scenes in the toile seemed to fit the mood of the pattern  and I chose rich reds, greens, and browns for the appliqué.


Before I was done, the primitive birds in the pattern had been replaced with more sophisticated ones, and I put a blackbird in every wreath in the design.  The one with the nest and its contents inspired the title.  I love to watch people try to find all seven birds.

I made all the sashing blocks (half-square triangles) the pattern described, but when I put them on the design wall, they seemed to overpower my appliqué.  In this photo, some of those triangles have been stitched together, others are just clinging to the design wall.

I redesigned the sashing in a few different ways, auditioned those, and chose the “on-point” strips of squares.

seven black birds

The original sashing pieces were added to the back, making that construction more complex than the front.  But I love it!  This quilt is often displayed on a ladder in the den, and the back is the side turned “out” as much as the front.  The photo above shows the entire back of the quilt as it was hanging at the Ga National Fair.

I quilted the big assembly (it finished at 84″ square) on my faithful Bernina home machine.  Using a 50-weight, two-ply cotton thread I danced with my sewing machine. (I’ve written many posts describing my free motion quilting technique, and if you put that phrase in the search box on the right side of this page, you will find many references.  Perhaps the  process has been described in the most detail here.)

This quilt was finished in 2009.  The photos are from several cameras, some indoors, some out.  That’s why the colors seem so different.  The earlier post with photos at The Farm House Restaurant is here.

Ruth’s Drapery Dress

1970s-quiltI met a new quilting sister today.  We have a lot in common.  We grew up learning how to sew, making our own clothes, and each of us added quilting to our lives about 15 years ago.

Ruth does almost all her quilting by hand, in an immaculate room in an immaculate house (I said we have a lot in common, not everything).  Her work is deliberate and beautiful; she enjoys making quilts and other things from cloth, too, like purses and tote bags.

As we shared stories of our first quilts, I mentioned that mine in the 1970s was a pathetic patchwork made from scraps of drapery fabric from my mother’s sample books.  Oh, we shared that, too – mothers who made draperies.  Ruth’s mother was an interior designer at Sears and would sometimes bring home remnants of drapery fabric, or imperfect panels.  Ruth would disassemble them and reuse the fabric.

One of her proudest moments came from a piece of fabric that was a lovely blue floral.  Ruth worked hard to stitch that into a beautiful dress.  She was so proud of it and eager to wear it on her first date.  In those days, the shoes, purse, all the accessories had to be just right.  As she described the preparation, I could imagine her twirling about her living room, light on her feet as the gathered skirt billowed about her tiny waist.

The first stop on their evening out was at his house to meet his parents.  She was confident about her appearance until she entered their living room and was invited to take a seat on their sofa.  A sofa on which she would have become invisible.  She and the furniture were wearing the same fabric.

What a shame.  All that work to make such a lovely dress that would only be worn one time.

Photos:  Ruth doesn’t have any of her fabric left.  But I do have some of my first quilt left; the squares of drapery fabric which haven’t disintegrated.  No, you can’t see the whole thing.  But it measures 87” x  94”  and is hand quilted.  Hand quilted by community women who must still talk about me for asking them to needle this jumble of fabrics, varying in thickness and fiber content.  The backing is flannel.  The whole assembly is ugly, yet warm. That’s the crumpled bundle you see in the top photo.

1970s-quilt-detailHere, in a detail photo, I focused on a fabric that I think might fit the description Ruth gave.  It looks a lot like the fabric covering the first couch I bought.

Embellishing with Paula

no presser footIf I had known old ladies had so much fun, I would have aged faster.

Today was session two with Paula Reid.  We stitched ribbons and beads and baubles.  We used dental floss implements, funky charms, and fancy stitches with specialty threads.  We made new friends and laughed a lot!

I even won a cone of wine thread.  Yes, you read that right, wine.  I told you old ladies had fun!

Not only did we disengage our feed dogs, we removed the presser foot!  Sewing is not for wimps.  But, man is it fun!  I have a new tool in my arsenal.  Now I know more ways to use those beads and baubles and fancy fibers I’ve collected.

Every member of the class was playing with ribbons and threads in a different way.  Taking a class is so inspirational – not only do you have an experienced teacher who shares her knowledge, but other participants spin off in different directions.  Take a class!

Simply Quilts was still on tv when I began quiltmaking in 2001.  I was still working, so I recorded the show every day, then watched it when I got home.  I learned most everything I know about quilting basics that way.  When I heard Paula Reid was coming to town, I knew she quilted on a domestic machine as I do, using what she calls the “fluff and stuff” method.  I also remembered her episode on beading and embellishments where she removed the presser foot.  I felt like I knew her already, because I had watched those SQ episodes over and over.

Online quilting shows still keep me up-to-date with the latest artists breaking the mold, or perfecting the mold, but it’s not the same.  I spend money to subscribe to some of the online shows (thequiltshow.com hosted by Ricky Tims and Alex Anderson is my primary resource).  I watch some youtube videos, too.

I read quilting blogs.  I listen to quilting podcasts. I follow links to other artists’ work from Facebook.  I goggle names of people whose work I see in magazines and online.

But nothing takes the place of on-site, person-to-person contact with an expert.  Thanks, Couture Sewing Center, for bringing Paula.  And, thank you, Paula, for coming to GA, and sampling our grits.  And, thank you, fellow classmates, for a fun two-day sewing experience!

Dancing with my Sewing Machine

Miss Ruby's Red Bouquet
Miss Ruby’s Red Bouquet

Occasionally I will stitch layers of fabric and batting together with a hand stitch–to revisit history, or pay homage to my foremothers, or because it “suits the piece”.  But my real love is hand-guided, free-motion quilting on my sewing machine.

I use my simple, straight stitch sewing machine without a stitch regulator.  The “domestic” sewing machine where you sit and move the fabric under the needle.  Some people liken the process to drawing something by holding the pencil in place and moving the paper underneath the point.  That’s it.  Except this pencil point is sharp and is moving up and down.

It did take a lot of practice to become adept at the process.  But I was determined.   Once I became satisfied that I was getting the hang of it, I relaxed and realized I thought of it as “dancing with my sewing machine.”  Now I can stitch and talk at the same time.  I can draw designs with the sewing machine without marking the fabric first.  And, I enjoy it.

How did I learn to do this?  By reading and watching videos.  Diane Gaudynski’s books were the most helpful to me when I started this process.  I watched videos of her at work, as well.  Then I tried the technique myself.  Once I had to have a book at hand at every step of the process, selecting the needle, remembering how to start and stop, adjusting the tension, troubleshooting.

Later on, websites like Leah Day’s 365 Free Motion Quilting Designs  gave me ideas for filler designs and how to stitch them.  Now, I have a file of designs in my sewing room, a bulletin board of designs on Pinterest, and a sampling of ideas in completed projects.  I sometimes run downstairs to look at a quilt on the wall to examine a stitching design.

I do tend to quilt my quilts heavily.  Bullet proof.  Within an inch of their lives.  I can spread the quilting further apart, but I’m usually disappointed in the end result.  My stitches end up being about 1/4″ apart in all motifs. That’s just how I like it.

Details of photo:  This quilt uses cotton fabrics, wool batting and cotton thread.  The variety of textures comes from several quilting designs: a feathered plume, curved grid, pumpkin seeds, some echoing, free hand vines, and paisley loops.

Jane’s first–grade wardrobe

In 1942, my sister started school.  My older sister.  Much older.

Jane as child

At that time, any respectable little girl had new clothes at the beginning of every school year.  But for first grade, it was especially important, in my mother’s eye, that Jane have new clothes.

My mother made every stitch of clothing that she, Jane, and later (much later) I would wear.  So, it was time to sew.  On her treadle sewing machine.

Just one problem.  Mama had burned her legs quite badly in a kitchen grease incident.  She had stiffness and pain and couldn’t power the machine.  But the show must go on.  The wardrobe must be complete.  Jane’s clothes must be sweeter than any other child’s in first grade (maybe the whole school).

So Jane sat in the floor, pushing the treadle with her little hands when Mama directed her to start and stop.

Now, I wasn’t there.  I can only imagine.  I’ve sewn on a treadle machine a few times for the novelty experience.  I know these few things:

Getting the motion started is not easy.

Stopping the motion (of the needle going up and down) is not instantaneous.

Five-year-old hands are not very adept at some things.

Five-year-old little girls have short attention spans.

Five-year-olds are fidgety.

Jane was always fidgety…well after the age of five.

In 1942, there was not a lot of leisure time on the farm.  So the effort that it took to corral a child and include her as an integral part of the ruffles, tucks, buttons, and sashes being assembled astound me.

Maybe this explains where I got some of my determination.