Come On In

An old favorite haunt of ours has reopened this summer.  A warehouse in town where a construction firm once sold architectural relics is now new and improved.  A new generation of owners has made these treasures available again.  It’s even better than before.

What we once visited as Second Chance is now 7th Street Salvage.  Oh, never fear, there are still ample choices awaiting a second chance!


Catherine has an eye for detail and has glorious displays everywhere.  In addition to the warehouse holding years of accumulated doors and windows and stair railings, there are delightful vignettes of small treasures. Catherine has searched out more vintage delights and combined books and chairs and jars and hinges in the most unique ways. Her husband Brent is her partner in the endeavor.

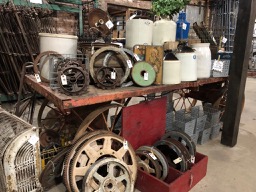
The organization of bits and pieces is amazing.  Even the most OCD of us would love the cataloging of salvage pieces here.


I appreciate the old and dusty, and sometimes rusty, elements that are abundant in these places.  In some places we visit, a mad jumble encourages me to walk away.  That’s not a problem here.  Everything is grouped and categorized with clear price lists displayed.  The simple quantity of things like doorknobs and hinges and backplates and keys is astounding, but the organization is amazing.  Eat your heart out, Container Store.

. 


Look – tiles organized by quilt block usage: Half-square triangles and trapezoids ready to go!

And, who knew how educational such shopping could be?  Did you know chickens needed laxatives?  

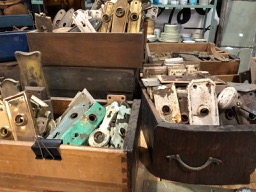
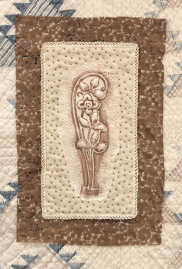
This display of doorplates had me spellbound.  I bought a couple and included one in a fabric collage about home.  And I learned a new word: escutcheon.

This amazing place is 7th Street Salvage in Macon.  Their schedule of open weekends is on facebook (https://www.facebook.com/7th-Street-Salvage-1903699043183111/).  The architecture of Macon is glorious.  To keep the elements of its historical beauty available to include in newer homes is a public service.

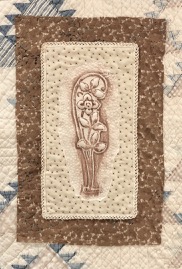
Here is the piece I am making using one of the doorplates I bought.  I used vintage linens and a house key from our ancestral past atop an overdyed quilt remnant to showcase the escutcheon.  It’s all ready to mount on a 16’ x 20” canvas here.


It looked bare.  So I’m auditioning edges.  What do you think?

Update: Here is a later post about the wall hanging once it was finished: I changed the name to Safe Haven.

Floozies

When I shared photos of quilts at Step Back, I promised details on the quilts I took on the visit.  So, for those who are wondering about the Floozies quilt, here is its story.

On my first visit to Step Back, I mentally named this cabin “Waiting for Chinking,” since that’s the stage it’s in.  I think there’s an art quilt with that title in my future, featuring this cabin.

When I later learned that this cabin is where the “floozies” hang out during the annual Christmas celebration, I knew I wanted my Floozies quilt to be photographed there.

One of the volunteers was kind enough to pose as a floozie with the Floozies! These fine upstanding women of the community act as hostesses at Step Back.  They dress in vintage clothing and pose for photos and provide history lessons for visitors.

In other settings, Floozies is a brightly colored quilt.  I love how the weathered gray of the buildings provides low contrast with the background fabrics; subduing things, making the birds seem right at home.

The title I used, A Flock of Feathered Floozies, came to me after a year of working on these birds to stitch them in place, then embellish them with beads and elaborate stitching using all kinds of rich threads.

The pattern, hand-dyed wool, and accessorizing threads and baubles came from Sue Spargo in her block-of-the-month pattern a few years ago.  I had taken a class with Sue in the past and knew there was a lot more to learn from her.  And learn I did.

In each month’s  packet there were actually materials for three blocks.  Wool background, wool for the birds, instructions, and embellishing threads of cotton or silk, of all sizes and twists.  There is a lot of detail in each block, so click on the photo to enlarge to see things more closely.

The project was time consuming for sure.  These birds were my companions virtually every evening for a year.  As we watch tv, I’m usually doing hand sewing.  Sometimes it’s a binding, sometimes it’s appliqué, but for that year, it was these birds.  Every bit of appliqué and embroidery was done by hand.  The sewing machine was used only when it was time to assemble the blocks and then quilt the layers together.

I kept up with the schedule, finishing each month’s three blocks just in time for the delivery of the next.  I would get an email from Sue’s son when the next month’s block had shipped.  If I wasn’t done, I would stitch faster!  My self-imposed rule was not to open a package until the previous blocks were completed.  Since I was anxious to see what Sue had planned for the next birds, I made sure I was ready when the mailman came.

With Sue’s companion book Creative Stitches beside me, I learned all kinds of embroidery stitches I had not known before.  The wool appliqué was done with a whipstitch with matching wool thread, so it’s virtually invisible.  Then each piece was backstitched with a Valdani #12 perle cotton thread.  Sometimes other threads were used for embellishing stitches, sometimes the Valdani.  

The background pieces were often embellished with ribbon or linen or cotton fabric, as are the birds.  Just look at the French knots on the linen portion of this block.


Of all the new stitches I learned, I think I was most fascinated with the drizzle stitches.  See them here?  They make a loose fringe-like decoration on the tail of the bird above, but if left longer, they can be couched down to hold them in place.

Once the blocks were completed, assembled, and a border (with a lot of wool circles appliquéd, surrounded by embellishing stitches) added, it was time to quilt.  I used a thin cotton batting (Dream Cotton Request) and a free motion stitch to secure the layers.  I love how the stitching shows up on the wool.

Obviously, many of these techniques are now part of my stitching repertoire. The quilt hangs in my sewing room, providing me with constant exposure to the idea to “do more, more, more.”  And I do.

Sue’s title for this quilt (and a pattern is available now) was Bird Dance.  But every southern girl knows that if a woman is overdressed; has too many accessories, she is in danger of being considered a floozie.  I love to see people smile when they look at my work, and this piece has generated a lot of giggles when people see the title, A Flock of Feathered Floozies.

And, there is a still at Step Back.  So Floozies collapsed there for a rest.

In case you missed them, earlier posts about Step Back are here (Christmas at Step Back) and here (my quilts visit Step Back).  And this earlier post has details about wool appliqué.


Shade Tree Mechanics

Life imitates art.

On a recent adventure to a pottery festival, I saw this beautiful 1953 Chevrolet truck.  It was a glorious blue, beautifully restored, and photogenic from all angles.  But my favorite angle was this one because it mimicked the truck I put on a quilt a few years ago.


In 2015, when pondering a design for a raffle quilt for my husband’s local Vintage Chevrolet Club chapter, I decided to create a scene where men might tinker on their machines. I love including trees on quilts, so the title was easy 

The quilt measures 44” x 70“ and is a combination of needleturn appliqué, raw-edge appliqué, hand-guided freemotion quilting, trapunto, and printing on fabric.

I drew the design on acetate transparency and using my vintage overhead projector, enlarged the image to fill the background fabric pinned to my design wall.  The same technique was used to draw the freezer paper templates for the tree trunks and the various pieces of the truck.  I used commercial fabric to build the images, working from background to foreground as I attached the pieces.


I posted these photos to Facebook as I worked and it triggered many memories my students in math classrooms in days gone by.


The quilt top on the design wall before quilting began.


Wool batting was layered underneath the Chevrolet emblem on the tailgate, stitched down with water soluble thread.  Then the excess batting was cut away before layering the entire top on a cotton batting.

Freemotion stitching made the layers become one, a quilt.  In addition, that stitching was used to differentiate areas of the dashboard, windshield, and tire tracks on the ground.  Freemotion stitching was used to attach the raw-edged leaves as well. 

A photo of an antique car tag was scaled to fit the license plate space and printed onto fabric.  Blue was chosen for the 1953 model truck because there is such a truck in Jim’s family.  And blue…well, it’s blue.

A bowtie-shaped Chevrolet icon served as the basis for the handwritten label.  Sadly, I don’t seem to have a photo of that.

Note:  One purpose in writing this blog is to record details of quilts I’ve made.  I had written most of these details in a draft a couple of years ago, but the photo of a real truck like the one I fabricated spurred the post to publication.  As I read the details I had written, I was reminded how important it is to write things down.  I had forgotten the details of the wool batting layer, raw edged leaves, and thread choices.  

Especially since the quilt is no longer in my possession, the written description of the process is more valuable in case I want to do something similar again.

Another note: Many of these photos were made with an older iPhone and poor lighting conditions.  Reducing them to post online makes for even poorer quality, but clicking on the image to enlarge it may reveal some details you miss in the original.

Blue and White and Red

Quick, answer this question:  “What is Sandy’s favorite color?” 

That line brought a big chuckle when I recently asked it at a presentation I was giving.

It’s a little obvious when my work is collected together.


But sometimes I like to add a bit of red and white to the blue, as I did in this piece that’s next on my list of “ready to quilt.”  

I’ve mentioned before that I like to work seasonally.  So a small project I made this year as July 4 approached was this one called Stars in Bloom.  The pattern came from Blackbird Designs, and I interpreted it in cotton and wool. 

The rich red flower petals are various reds from my wool stash, the most prominent being from that red cashmere coat I bought a few years ago.  The vines and leaves and blue stars are cotton fabrics.


I certainly want the quilt label to be unique.  It’s important to include a label identifying the quilt title, the maker, the date.  A simple rectangular piece of cloth containing this information is better than nothing, but since I began quiltmaking, I’ve enjoyed including elements of the quilt’s design in the label.

Ollie Jane’s Flower Garden has a lily similar to the one on the front of the quilt as its label.  Walker’s Pasture has a miniature photo of the front of the quilt on the label.  Mom and Apple Pie’s label features a flag (an appliqué element from the front – and the label you see at the right).

That said, I may have gone a bit overboard in this small piece.  The combination of hearts and stars on the front led me to include a heart and a star.  It took a big star (well, big relevant to the size of the quilt) to contain the title and my name.  Then an even bigger heart was needed to surround the star. Above, the view of the backside.  Do you think the label is visible?

As has become my custom, I embraced the raw edge on this label.  The star was machine stitched to the heart, then the heart was attached using the “glue stitch” I learned from Jude Hill, hand stitching the label through the quilt back and batting.  As time goes on, the raw edges will fray more, adding to the charm of the back.  Or to the tattered look, depending on your perspective.

More about Stars in Bloom:  This piece finishes at 12” x 17”.  The appliqué is a combination of wool and cotton.  The cotton pieces are hand stitched needle-turn appliqué.  Some hearts are made of felted wool and stitched down with a whip stitch, again by hand.  The quilting is free-motion machine stitching (incorporating some hearts in the design) using silk thread on top and cotton thread in the bobbin.

Backsides


I like backsides.  When I’m doing street photography, I often focus on images of people from the rear.  Maybe that’s because I think the result is more likely to convey a universal truth than if the face is there; identifying the individual as, well, an individual.


With quilts, too, I like the backsides to be interesting compositions.  The expected traditional way to back a quilt is to use yardage of one fabric.  I admit I do that sometimes.  But most often when I do that, I find the result to be boring to me.

I often piece the backs of my quilts, especially the large ones.  The blue “wonky star” above is on the back of GBI Blues.  I included lots of my favorite blue fabrics that hadn’t found a home on the front.  In 70 and Still Wearing Jeans, I used pieces of fabrics collected for Jim’s quilt where the images were too large to include in the stars on the front.

In Seven Black Birds, I incorporated the discarded half-square triangles created for the sashing in the back.  That quilt hangs on a ladder in the den and more often than not, the “back” side is what is turned out to the viewer.  That’s the quilt here on the hayrack and bicycle.

Sometimes I have fabric that I don’t want to cut up into little pieces for use on the front of the quilt, so I use a whole piece of it as the back of something.  That way I can leave the piece as a whole unit. The toile piece in the photo above is on the back of Blue Tumbling Blocks, a small wall hanging described here.   I recently wrote about Linen Baskets in which I did the same thing with a fabulous Jane Sassaman print.

My most recent piecing effort was inspired by a piece of fabric I’ve had in my stash for many years.  I just didn’t want to cut it up.  So a pattern involving books (paper foundation pieced) seemed perfect for the front of a quilt with the “reading” fabric on the back.  So, it’s true.  I designed a quilt with the back planned first.  Here is a photo of the backing fabric folded on top of the pieced top.  More details and photos will follow when the quilting is done.

A Lily for Ruth


Ruth loved gardening.  She loved the feel of the brown earth between her fingers as she planted bulbs and seedlings, anticipating the color that would come later.  She reveled in a pleasant day with white clouds in a blue sky.

At least that’s how I imagine the Ruth whose family had this lily engraved on her headstone.


To remember Ruth forever, I made a crayon rubbing of the lily on silk fabric and added dimension and detail with free motion machine stitching.  I added some lace and beads with  hand stitching and layered it all atop an old quilt remnant.  

I hope Ruth would be pleased.


Jim and I enjoy exploring cemeteries.  Sometimes those walks end up in artwork.  Earlier references to other adventures are here and here and here.

A Sewist Died


While touring a favorite antique mall of ours, I saw a booth with a new basket of sewing goodies.  Patterns, thread, buttons, were all gathered together for my plunder.  There were handmade wooden buttons and needlebooks distributed as advertising media, too.

This booth’s owner must have gone to an estate sale where the remains of a sewing stash were discarded.  The old wooden spools with their richly colored threads are still beautiful and the vendor must have enjoyed corralling them artfully in jars and vases.  As I studied the bits of an unknown woman’s history, I thought of the line I’ve recently seen, “our children don’t want our stuff.”  That headline advises us to clean out, get rid of that stuff (the jars and vases included), so our children won’t have to.

Now, I don’t want my children to have a burden to clean out my stuff, but I don’t want to get rid of it now!  I’m loving my stuff, just as Ester, or Mildred, or whatever this woman’s name was, loved hers.  She bought those patterns and planned clothes for her and her children and grandchildren.  She selected the threads and buttons to make those dreams a reality.  And the leftover pieces are now there for me and others to cherish, repurpose, or just see and remember her pleasure.

I still have bits of my mother’s and my mother-in-law’s sewing treasures.  I use some of them every day.  Others, I just enjoy their presence as I sew.  And, though I didn’t buy all of Mildred’s stuff today, someone will.  And, Mildred’s selections will become part of another stitched work of love.

Often when I buy these fabric treasures, the clerk at the counter will ask what I’m going to do with them.  It seems everyone loves them but, “no one knows what to do with them.”  When I explain about my art, sometimes showing them a photo, I get mixed reactions.  Some say, “oh, no, you’re going to cut it up?!!”  Others say, “That’s good.  It will continue to live on.”  That’s my hope.

Note:  I know “sewist” looks awkward in print.  The first image that comes to mind when you read “sewer” is not of a person pulling needle and thread through fabric, now is it?  Right.  So, I embrace the word sewist.

Seven Black Birds

Seven Black Birds is a quilt that’s been on an outdoor photo shoot and I promised more details of its story – a few months ago.

Later is better than never, so here it is.

My friend Kathleen and I shared a love of needle turn appliqué and wanted to make a large album style quilt, each using the same pattern, but varying the fabrics.  We chose the Friendship’s Garden pattern by Barb Adams and Alma Allen.

We shared the plan with other guild members and soon had 20 or more members each making her own version of this project.  At one of our guild’s quilt shows, nine completed quilts made from this pattern were hung together so that visitors could see how individuals personalized their own creations from one common pattern.

I kept detailed photos of my work in progress, so I can share some of my design process through the story of this quilt.

I found a toile fabric in soft shades of brown for my background.  The country scenes in the toile seemed to fit the mood of the pattern  and I chose rich reds, greens, and browns for the appliqué.


Before I was done, the primitive birds in the pattern had been replaced with more sophisticated ones, and I put a blackbird in every wreath in the design.  The one with the nest and its contents inspired the title.  I love to watch people try to find all seven birds.

I made all the sashing blocks (half-square triangles) the pattern described, but when I put them on the design wall, they seemed to overpower my appliqué.  In this photo, some of those triangles have been stitched together, others are just clinging to the design wall.

I redesigned the sashing in a few different ways, auditioned those, and chose the “on-point” strips of squares.

seven black birds

The original sashing pieces were added to the back, making that construction more complex than the front.  But I love it!  This quilt is often displayed on a ladder in the den, and the back is the side turned “out” as much as the front.  The photo above shows the entire back of the quilt as it was hanging at the Ga National Fair.

I quilted the big assembly (it finished at 84″ square) on my faithful Bernina home machine.  Using a 50-weight, two-ply cotton thread I danced with my sewing machine. (I’ve written many posts describing my free motion quilting technique, and if you put that phrase in the search box on the right side of this page, you will find many references.  Perhaps the  process has been described in the most detail here.)

This quilt was finished in 2009.  The photos are from several cameras, some indoors, some out.  That’s why the colors seem so different.  The earlier post with photos at The Farm House Restaurant is here.

Fern Fronds and Fibonacci


A historic covered bridge seemed the perfect backdrop for a quilt photo shoot.  On a beautiful spring day Jim and I loaded the car with a couple of cameras, a couple of tripods, and a couple of quilts.

This stop was at the Red Oak Covered Bridge near Woodbury (details and a map can be found here: http://www.exploregeorgia.org/listing/476-big-red-oak-covered-bridge).  The quilt you see is my Fern Fronds and Fibonacci quilt, made in 2007.  It finished at   56” x 61” and features a sunprinted image of an Australian Tree Fern (Cyathea cooperi ) which was growing in our backyard garden at the time.

Some of my first explorations into putting images onto cloth were through the process of sunprinting.  This predates the printing, painting, and dyeing I’ve been exploring more recently.

The life size image of the fern frond measures 29“ x 34“.  The turquoise and white blueprinted image needed some color to give the quilt a more spectacular “wow” factor, so I chose to include a variety of brightly colored fabrics in the border.

Many batiks were used, along with some fossil fern prints.  I still love that line of fabric, and continue to use them a lot.  They are soft and loosely woven, but to me this makes them turn easily for appliqué.

To create a unique border, I referred to the Fibonacci sequence – the infinite mathematical sequence 1,1, 2 ,3, 5, 8, 13, 21, 34… .  Each term of the sequence (after the first two) is found by adding the preceeding two terms.  For those of you who want a math review:   t1 = 1, t2 = 1, tn+1 = tn + tn-1.  And the answer to the inevitable test question, “is it arithmetic, geometric, or neither?” can be found at the end of the post.

The Fibonacci sequence is found in the growth pattern and leaf structure of many plants, including ferns. Google will help you with more intense investigation if you want to pursue it.

To interpret this into my quilt, I made colored rectangles all 1” tall, but whose widths were 1”, 1”, 2”, 3”, 5”, etc.  To avoid single loooong bands of color, I did not use a length greater than the 34” (limiting myself by the dimension of the plant image itself), I just repeated that sequence in a spiral until I was satisfied with the look.


The woven ribbon portion of the border was a design taken from one of Sally Collins’ books.

I was very inexperienced with machine quilting at the time and didn’t feel confident stopping and starting at the edge of the design.  So I quilted the grid in the sunprinted space by hand.  Make that read BY HAND.  That pretreated fabric is more closely woven than your normal quilting cotton making this a less than pleasant experience.  I used Dream Cotton batting which is nice and thin and generally easy to quilt through.  But now I know that wool would be sweeter to needle.  I don’t think wool batting was widely available at that time.

Then I dared to freemotion quilt fern fronds in the border space.  I traced a section of the fern, transferred it to the fabric using a lightbox, then stitched with an invisible polyester thread.

As I write this, I am amazed at how much I’ve learned since that experience.  But even though it’s full of what many would see as mistakes; I love this quilt.  I still love the fern.  I love the unique opportunity to combine nature and mathematics in fabric, and I love that I’m still learning things about quilting.

At the time I printed this image, I made many more blueprint images of plants including multiples of this plant.  I love planning ways to include these fabric images in new projects.

Older posts with details of other quilts with sunprinted images are these:

https://sandygilreath.com/gbi-blues/,

https://sandygilreath.com/whats-in-a-name/ (this one had a sunprinted label)

https://sandygilreath.com/annie-maes-lace/

Answer to the math question:  neither.  Arithmetic sequences are generated by adding a fixed constant to one term to get to the next; geometric, by multiplying.  Neither is the case in this sequence.

The black & white photo with color accent is Jim’s darkroom magic.  The other photos are mine.  If you think the fern is blurry, it’s not the camera.  It’s the motion of the fern in the wind during the 15-minute sun exposure.

Diggin’ in the Dirt

With a fence full of flowers like these, is it any wonder that gardening and tools are in every room of my house?

I love diggin’ in the dirt this time of year.  My morning walk has me counting the hostas that have raised their heads above the soil line, inspecting the buds on young trees, and even pulling a few weeds here and there.  Dirt therapy has always been a good thing, but at our house we seem to be more immersed in the pleasure than some years.  Perhaps because we were traveling last spring and didn’t get to enjoy newly emerging growth in our yard we are appreciating it more now.  And the dogwoods and azaleas have never been prettier.

While in the sewing room today, I noticed that not only were digging implements under the needle of my sewing machine, but the design wall holding projects in progress has gardening as a theme, too.

The ongoing free motion quilting is on my version of Lisa Bonjean’s Primitive Garden.  It’s wool appliqué on cotton, including some flannel and some homespuns, too.

Primitive Garden is not the first time rakes have appeared on one of my quilts.  This little wall piece pictured above (Off to the Garden, 22″ x 21″) is one I quickly assembled when I bought my Bernina.  I was anxious to drop the feed dogs and quilt, so the appliqué is fused.  You won’t read that often here, as I prefer needle turn appliqué.  But on this occasion, fuse I did.  I added a cotton ball for the tail and danced with my sewing machine.  This wall hanging helps us welcome spring every year.

As usual, click on any image to enlarge and see details.