Dots and Vines

Yes, I’ve been sewing in this safe-at-home time.  I’ve been busy finishing old abandoned projects as well as exploring new ones.

One of the new things I’ve done is this piece I called Dots and Vines.  Inspired by my grandmother’s quilt on this table in our den, I assembled many many circles appliqued on squares.  

Ollie Jane’s quilt lives on this table most of the year and I continually look at it and think, what a powerful design.  I ought to recreate it.  Finally, I did.

Though it doesn’t look much like her work (nor much like mine, for that matter – it’s rather modern, don’t you think?),  it’s another example of stitching that reflects the love of cloth through generations; a tale that never grows old.

I chose to use Cherrywood handdyed fabrics.  The circles are 1” in diameter, the squares finish at 3”.  I spent many morning hours on the porch stitching these, and many more hours doing the same at night in front of the tv.  Many hours of delicious time thinking and soothing the soul while pulling a threaded needle through cloth.  

There were days when the finished blocks danced all around my design wall, trying to find the right arrangement of color.  Here you see them with several fabrics I considered using as borders.

But the final arrangement has no border.  A nice stripe from Kaffe Fassett’s collection as binding seemed to bring enough closure.

I knew the entire time that I wanted to quilt a meandering vine from variegated thread, so that’s the rest of the title, Dots and Vines, a bit of homage to a book I came to love in college math classes, The Dot and the Line.  I considered August 12, 2020  as its title – that’s the day I finished the quilt and it just happened to be the 225th day of this calendar year.  But that title requires too much explanation in casual conversation, so Dots and Vines it is.

I made many more circle blocks that are waiting another use.  But the 225 that I chose means I have a 45” square finished piece.  I like that size.  It’s good to drape over a chair, take along on a photo ride-about, or use as a table topper.

I continue to stay busy with a variety of things, including nature photography.  But most things are connected to fiber in some way.  Don’t you think it would be interesting to make a textile version of these mushrooms?  I see red thread here.

More about my grandmother’s quilts can be found here and here. Enter “Ollie Jane” in the search box for even more.

Miss Nellie’s Country Garden

On a recent Saturday ride-about, we took a big wool quilt in case we saw a spot for photos.  We found a spot at Starr’s Mill, and gave Miss Nellie’s Country Garden some places to pose.

The quilt is my version of a pattern from Lisa Bongean of Primitive Gatherings.  The wool appliqué is stitched by hand onto cotton background fabrics.  The piecing together of the blocks and the quilting are done by machine.  

As I worked on all aspects of this quilt, I thought of my Aunt Nellie.  The wool appliqué – informal and free – and the garden theme led me to know the quilt had to be named for her.

She was known as Miss Nellie to most everyone in the community.  I was lucky enough to know her as Aunt Nellie.  She was a teacher, and so there are some people who knew her as Miss Hobby, too.  She lived next door for my entire childhood, and serves to inspire me every day of my life. 

She lived to the age of 91, and only in her 91st year was she unable to tend her garden.  She grew vegetables to eat, to share, to can, and to freeze.  She grew flowers for the joy of the bloom.

Aunt Nellie’s vegetable garden was neat and orderly, but her flowers were a riot of stems and leaves and blooms.  Weeds were kept at bay in both places, but the separation she maintained in her butterbeans and squash was not valued in her flowerbeds.  The snapdragons and pansies, the petunias and lilies and gladiolas all mingled about, with her snipping a cutting here and poking it in an empty spot there to take root and fill a space.  And, take root they did.  Her green thumb was legendary, possibly due in part by the load of fresh cow manure a local farmer delivered to her every spring.

She grew geraniums in pots, dahlias in a  separate bed all their own.  She had a bit of yard art, too.  I remember a whimsical bird bath, tiers of porcelain basins given to her by a friend.  Once it developed leaks, it was repurposed as a planter for succulents.


So the whimsical nature of some of these quilt blocks is a perfect tribute to a woman from the country.  The label is a block I had made because Miss Jump, one of Linda Brannock’s creations, reminds me of Aunt Nellie.

More quilt details:  The quilt finished at 60” x 75”.  I used a whipstitch to secure the wool to the cotton, usually with perle cotton thread, but sometimes with embroidery floss or even fine sewing thread.  The quilting is all hand-guided freemotion stitching on my home machine.  I used Dream Cotton Request batting and a cotton fabric for the background.  And it was all fun!  Just as Aunt Nellie would have wanted it to be.

Oh, and another detail.  Because the wool is so visually heavy, I made a wider binding than I usually do.  The “standard” 1/4” binding seems so wimpy on a large wool quilt, so I cut the binding 3 1/2”, then folded in half and stitched it to the front of the quilt with a hearty 3/8” seam allowance (or scant 1/2”).  The binding then finishes (with these fabrics) at 1/2”. I used a woven plaid (easy to stitch down by hand) and cut it on the bias.

More about Aunt Nellie:  I’ve written a lot about Aunt Nellie already, if you type “Nellie” in the search box, you’ll find several references to her.  But, she is the older of the two “Spinster Sisters” in this post, where I shared more details of her: https://sandygilreath.com/spinster-sisters/

Floozies

When I shared photos of quilts at Step Back, I promised details on the quilts I took on the visit.  So, for those who are wondering about the Floozies quilt, here is its story.

On my first visit to Step Back, I mentally named this cabin “Waiting for Chinking,” since that’s the stage it’s in.  I think there’s an art quilt with that title in my future, featuring this cabin.

When I later learned that this cabin is where the “floozies” hang out during the annual Christmas celebration, I knew I wanted my Floozies quilt to be photographed there.

One of the volunteers was kind enough to pose as a floozie with the Floozies! These fine upstanding women of the community act as hostesses at Step Back.  They dress in vintage clothing and pose for photos and provide history lessons for visitors.

In other settings, Floozies is a brightly colored quilt.  I love how the weathered gray of the buildings provides low contrast with the background fabrics; subduing things, making the birds seem right at home.

The title I used, A Flock of Feathered Floozies, came to me after a year of working on these birds to stitch them in place, then embellish them with beads and elaborate stitching using all kinds of rich threads.

The pattern, hand-dyed wool, and accessorizing threads and baubles came from Sue Spargo in her block-of-the-month pattern a few years ago.  I had taken a class with Sue in the past and knew there was a lot more to learn from her.  And learn I did.

In each month’s  packet there were actually materials for three blocks.  Wool background, wool for the birds, instructions, and embellishing threads of cotton or silk, of all sizes and twists.  There is a lot of detail in each block, so click on the photo to enlarge to see things more closely.

The project was time consuming for sure.  These birds were my companions virtually every evening for a year.  As we watch tv, I’m usually doing hand sewing.  Sometimes it’s a binding, sometimes it’s appliqué, but for that year, it was these birds.  Every bit of appliqué and embroidery was done by hand.  The sewing machine was used only when it was time to assemble the blocks and then quilt the layers together.

I kept up with the schedule, finishing each month’s three blocks just in time for the delivery of the next.  I would get an email from Sue’s son when the next month’s block had shipped.  If I wasn’t done, I would stitch faster!  My self-imposed rule was not to open a package until the previous blocks were completed.  Since I was anxious to see what Sue had planned for the next birds, I made sure I was ready when the mailman came.

With Sue’s companion book Creative Stitches beside me, I learned all kinds of embroidery stitches I had not known before.  The wool appliqué was done with a whipstitch with matching wool thread, so it’s virtually invisible.  Then each piece was backstitched with a Valdani #12 perle cotton thread.  Sometimes other threads were used for embellishing stitches, sometimes the Valdani.  

The background pieces were often embellished with ribbon or linen or cotton fabric, as are the birds.  Just look at the French knots on the linen portion of this block.


Of all the new stitches I learned, I think I was most fascinated with the drizzle stitches.  See them here?  They make a loose fringe-like decoration on the tail of the bird above, but if left longer, they can be couched down to hold them in place.

Once the blocks were completed, assembled, and a border (with a lot of wool circles appliquéd, surrounded by embellishing stitches) added, it was time to quilt.  I used a thin cotton batting (Dream Cotton Request) and a free motion stitch to secure the layers.  I love how the stitching shows up on the wool.

Obviously, many of these techniques are now part of my stitching repertoire. The quilt hangs in my sewing room, providing me with constant exposure to the idea to “do more, more, more.”  And I do.

Sue’s title for this quilt (and a pattern is available now) was Bird Dance.  But every southern girl knows that if a woman is overdressed; has too many accessories, she is in danger of being considered a floozie.  I love to see people smile when they look at my work, and this piece has generated a lot of giggles when people see the title, A Flock of Feathered Floozies.

And, there is a still at Step Back.  So Floozies collapsed there for a rest.

In case you missed them, earlier posts about Step Back are here (Christmas at Step Back) and here (my quilts visit Step Back).  And this earlier post has details about wool appliqué.


Blue and White and Red

Quick, answer this question:  “What is Sandy’s favorite color?” 

That line brought a big chuckle when I recently asked it at a presentation I was giving.

It’s a little obvious when my work is collected together.


But sometimes I like to add a bit of red and white to the blue, as I did in this piece that’s next on my list of “ready to quilt.”  

I’ve mentioned before that I like to work seasonally.  So a small project I made this year as July 4 approached was this one called Stars in Bloom.  The pattern came from Blackbird Designs, and I interpreted it in cotton and wool. 

The rich red flower petals are various reds from my wool stash, the most prominent being from that red cashmere coat I bought a few years ago.  The vines and leaves and blue stars are cotton fabrics.


I certainly want the quilt label to be unique.  It’s important to include a label identifying the quilt title, the maker, the date.  A simple rectangular piece of cloth containing this information is better than nothing, but since I began quiltmaking, I’ve enjoyed including elements of the quilt’s design in the label.

Ollie Jane’s Flower Garden has a lily similar to the one on the front of the quilt as its label.  Walker’s Pasture has a miniature photo of the front of the quilt on the label.  Mom and Apple Pie’s label features a flag (an appliqué element from the front – and the label you see at the right).

That said, I may have gone a bit overboard in this small piece.  The combination of hearts and stars on the front led me to include a heart and a star.  It took a big star (well, big relevant to the size of the quilt) to contain the title and my name.  Then an even bigger heart was needed to surround the star. Above, the view of the backside.  Do you think the label is visible?

As has become my custom, I embraced the raw edge on this label.  The star was machine stitched to the heart, then the heart was attached using the “glue stitch” I learned from Jude Hill, hand stitching the label through the quilt back and batting.  As time goes on, the raw edges will fray more, adding to the charm of the back.  Or to the tattered look, depending on your perspective.

More about Stars in Bloom:  This piece finishes at 12” x 17”.  The appliqué is a combination of wool and cotton.  The cotton pieces are hand stitched needle-turn appliqué.  Some hearts are made of felted wool and stitched down with a whip stitch, again by hand.  The quilting is free-motion machine stitching (incorporating some hearts in the design) using silk thread on top and cotton thread in the bobbin.

Birds of Amicalola

On a recent visit to a train station and refurbished old store, I took my camera and a quilt.  Birds of Amicalola posed on a bench and in front of the weathered boards of Mildred’s Store.

The quilt is made using the same basket pattern I created for Miss Lily’s Baskets.  In this quilt, I used charm squares of Kaffe fabrics for the appliquéd baskets and Cherrywood hand-dyed blue fabric for the background.  I made a lot of these blocks (I still have quite a few left over for some yet unknown project) before deciding how to assemble them.

I had some bright fabric on hand that had birds flying all about vines and leaves.  Those birds said, “we want to fly amongst those baskets.”  And the leaves seemed perfect for the wreaths in the baskets of the three focus blocks, so I fussy cut the leaves and birds and attached those elements with the invisible basting stitch I had learned from Jude Hill.  When I quilted, I stitched those pieces down with free motion stitching before moving to the background quilting.

The quilt measures  51 ” x   58″ .  The background quilting was done using silk thread (100-weight) on top, two-ply cotton (50 weight) in the bobbin.  The vine in the border is quilted with 30-weight polyester thread.


Photos of this quilt in progress were included in the post here.  Oh, and we were on a trip to Amicalola Falls State Park when I added the birds and leaves to the basket blocks.  That’s the source of the title.


And here is a closeup of the vine stitched on the border.

You can click on any image to enlarge and see details.

An update to include a photo of the entire quilt:

Here it is hanging in our local guild’s show.  The ribbon is for Best Machine Quilting on a Home Machine.

The Glow of Orange

It’s October, cool, and time to think about glorious leaves falling.  I love to see the leaves drift down from the trees, and I love the colors as the chlorophyll breaks down.  The shades of red and yellow taking over from the green are spellbinding.  And orange is there, too.

Orange is not my favorite color in decorating or in quilts.  But this time of year, I incorporate it into our lives.  Our guild’s designated Challenge Queen, Tess, loves to require a bit of orange in her rules; so I’m learning to incorporate it without screaming.  And, if the theme is fall, I get to use pumpkins, which I love.  I love their shapes, texture, and color.  The pillow here is wool appliqué. The pumpkin and leaves wools were purchased hand dyes, the background is a recycled wool skirt, felted and reused.

Two recent projects include pumpkins.  This 5” x 7” framed piece is a pumpkin appliquéd onto a fabric replica of an old sampler in colors of autumn.

Another pumpkin is hand appliquéd on an old linen doily with free-motion machine quilting, hand embroidery, and beading.  It is attached to a remnant of an old quilt and measures 22” x 17”.

The middle layer is a found remnant of linen drapery fabric. I just love the grasshopper.  You can click on any photo to enlarge it, but this is one you might really want to examine.

Above is the entire piece.

This post describes some earlier quilts with fall themes and colors.

And to read more about Tess and challenge quilts, you can type “challenge” in the search box, or click on that category name.  There are several related posts.  Many include orange.

And, an earlier quilt called After the Chlorophyll is here.

On My Design Wall

I have a magic wall in my sewing room.  Two 4’ x 8’ sheets of foam insulation board are covered with fleece and nailed to the wall.  They hold projects for me to consider, analyze, rearrange, and organize for sewing.

My grandmother did not have a design wall.  Quilters these days are advised to use a vertical wall to consider color placement and other options in the quiltmaking process.  I am fortunate to have space to have a permanent design wall, but there are options to use one that can be put away when it’s not in use.

In the photo here, you see that my space is larger than most quilts I make.  The left side holds a wall quilt in progress.  Once I start sewing the blocks together, I’ll put them back on the wall in units so the layout doesn’t become confusing.  The magic of this wall is that fabric clings to the fleece (or flannel, or batting, whatever you use) without pins. This makes it easy to move blocks around until the arrangement is just right!  Once several blocks are sewn together, the weight sometimes makes it necessary to add pins to hold things in place.  And, yes, I do move to the floor when the whole thing is too cumbersome to hang – but by then the design decisions have been made.

My wall also serves as a holding station for projects on the way to becoming.  As I see pieces in progress (as on the right side of the photo here) I plan ways to bring them to completion, or combine them with another project.  Serendipity comes into play sometimes as stray blocks sit beside each other and become companions in a quilt.


The blocks on the wall are a reinterpretation of Miss Lily’s Red Baskets, which I shared here.  I stitched all these little baskets (they finish at 5 1/2” square) with Kaffe Fassett fabrics onto a Cherrywood background.  Once I put them on the wall, they needed something.  I decided to use the focus baskets like one in Miss Lily’s project, but, rather than one, I used three.  And, rather than a bow, I added these birds cut from a funky whimsical fabric I had on hand.  The leaves came from that fabric, too.  While the baskets are all needleturn applique, the birds and leaves are raw-edged.  They are held in place with Jude Hill’s invisible baste stitch.  As I do the free motion machine quilting, I’ll stitch these pieces down.

This photo shows my debate about using all basket blocks, or including some free-flying birds.

As usual, you can click on any image to enlarge it.  When done, just exit the photo and you’ll come back to this page.

Quilters’ Retreat

A few days ago, I crashed a party.  We were on a backroads jaunt and I remembered that some of my friends were attending a quilting retreat at a nearby wildlife refuge.  I asked Jim to make a stop and let me say Hello.  He asked, “Can you just pop in?  Were you invited? “  I assured him, “It will be fine.  They won’t mind.  They will all be happy to show me their projects.”

And, they were.  They were busy.  They were happy.  And they did not mind my intrusion.

There is a reason many quilters like the bee motif.  Quilters and bees buzz about with a purpose in mind and get things done!

I was greeted with smiles and hugs from many friends, and made the acquaintance of new quilters as well.  Sheila and Barbara and Jean and Donna were the first to see me and report on the fun.  I didn’t get photos of everyone’s work, but everyone was busy and productive.
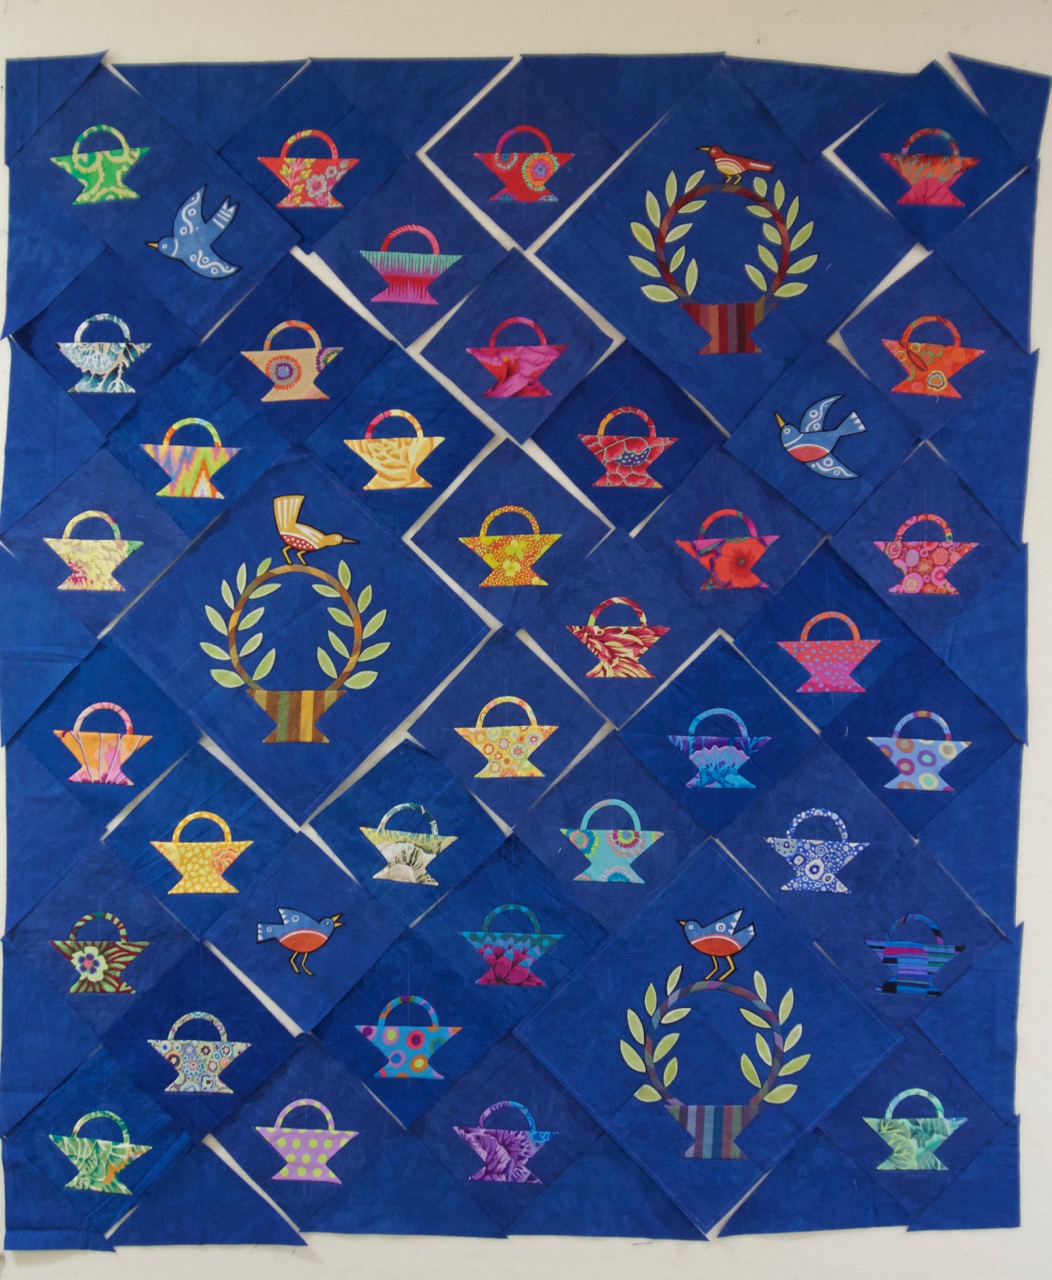
Angie was piecing some animals.  Mary was working with baskets.  Jean had stars on her design wall.  She had discovered that her alternate blocks were cut from directional fabric, unnoticed until they were put on the wall.  She had lots of advisors to help her decide how to deal with this dilemma.

Joyce had two big appliqué projects: a Baltimore Album that just needs a few details and a border attached, and a fabulous Kim McLean pattern all with big pieces of Kaffe fabrics.  Joyce is one of our guild’s charter members and she still produces more quilts than several of the rest of us combined!  She was sitting beside Hilda, her BFF for more than FIFTY years.  They have worked on many projects and been to many retreats and heard many stories in that time, don’t you know?

Dewey was there with his longarm machine and an eight-foot table.  He had already quilted two quilts at the retreat for other participants and was doodling on his machine while he waited for others to get backs prepared for him to quilt their tops.

Here is Donna working on a One-Block Wonder.  And Dewey had just finished the quilting on her Friendship Garden  before the retreat.  Now she can add the binding and label and it’s done!

Mary had run to the store, but her work-in-progress is here.  Mary is the organizer of this event.  Someone has to take charge and she does it well!  She reserves the space, organizes the guest list, plans the food, and assures that everyone has fun.  And she is successful, because these people plan their calendars around Mary’s retreat dates.  Because of her, the sisterhood thrives.

Candace is a local designer and teacher with her own line of patterns.  Here she is working on a new pattern design.  And there were some of her finished products with chickens made from her hand-woven fabrics.  Wow!

Lynn was putting the finishing touches on a garden scene, while Eleanor was working on a batik project complete with labels to insure that every block ended up in exactly the right place.

Getting away from home, focusing on a project or two, socializing while you work, learning from each other, what a blast!  I loved visiting this beehive.

Pomegranates and Poinsettias


For many years I decorated for Christmas using my Grandmother’s basket quilt she made in 1890 (that story is  here).  When I started quilting, I longed to make my own holiday quilt.  Now one of the first steps in decorating our house for Christmas is to swap out the fall quilts for red and green ones.

I love to sew with red and green fabrics during this time of the year so I often start a new project for my sewing serenity during the season.  In the days of Christmas 2008, I began work on what became  Pomegranates and Poinsettias.  I was spending quite a bit of time with my mother-in-law, Sadie, during a time of failing health for her.

She loved helping me decide which red fabric should be used for a particular bloom, which green should be used for stems and leaves.  She loved the sampler background (as does everyone else who sees this quilt), and when I decided to add buttons for the berries, she giggled like a little girl.  Imagine, putting BUTTONS on a quilt.
That was something her mother had never done!  This piece was finished in June 2009 and has been the focal point on a wall in our house every Christmas since.  It is based the Holly Threads pattern by Need’l Love.  Mine finishes at 44″ square.


Portrait of Red Coneflower


red-coneflowerA recently purchased linen doily reminded me of a mat for a framed portrait.  I didn’t have a photo on fabric that fit, and wanted to stitch something on this marvelous piece of linen with the wide handmade tatting.

A simple coneflower is always fun to appliqué, and I had seen somewhere the idea of using a spool of thread as the vase.  So, a few snippets of fabric, a good tv show in the background, a bright light at my side, and the stitching began.

Once the appliqué and embroidery were done (see the French knots at the base of the seed head?), it was time to find a base to set off the oval.  The French General print in red was perfect.  So, I layered wool batting beneath the oval, threaded up the machine with silk thread, and echoed the appliqué with free motion quilting.

Once I cut away the remaining batting from behind the red fabric, it was time to seed stitch the piece to an old quilt as the back of the assembly.  A yellow and white pieced basket quilt from an antique store fit the bill, but the white was a bit stark.  A scrap of red ticking came to the rescue, adding another layer of matting to the frame job.

red-coneflower-backAs I neared the finish, I hadn’t come up with a title.  But my original plan to let the doily serve as an inner mat for a portrait was still on my mind, so Portrait of Red Coneflower was simple enough.  One more vintage doily (with a history and stains to prove it) served as the label.
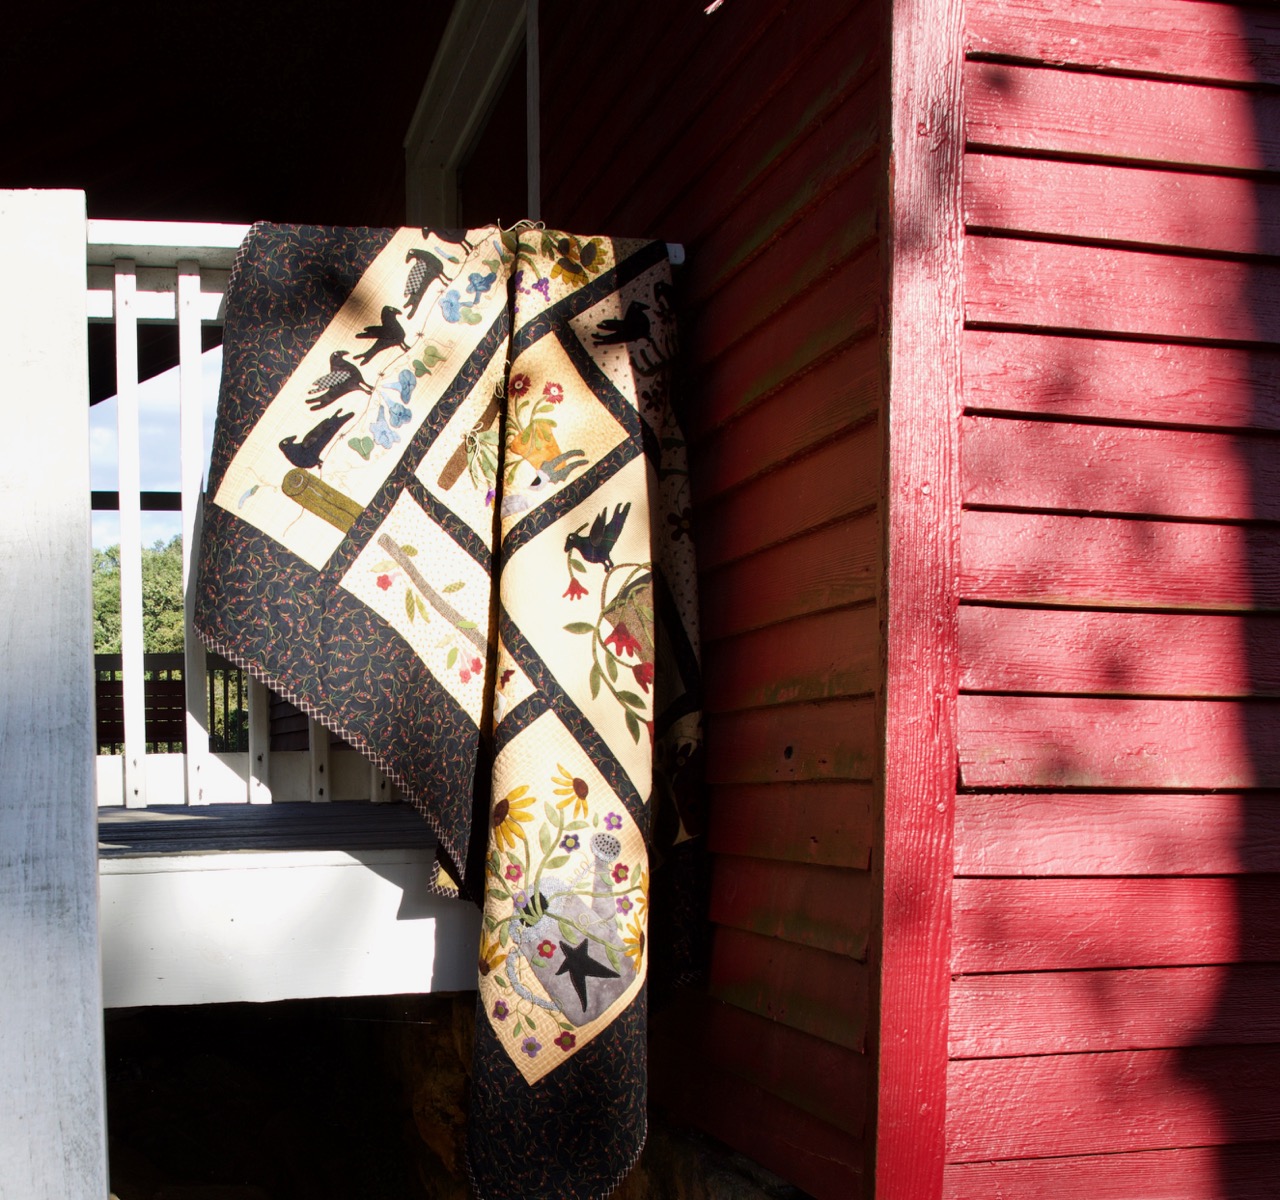
The finished piece measures 16” x 20” and the hanging sleeve utilized a leftover strip of the red ticking.