Fairhope Feedsacks

It was a gray day when we recently visited Fairhope, Alabama, but I had a bit of color in my purse.  Early in my quilting adventures (2003, I think), we visited Fairhope and I saw a log cabin quilt made from reproduction feedsack fabrics.  I came home and started sewing.

When we headed to Fairhope last week, I rolled the little quilt and tucked it into my purse just in case there were any photo ops.

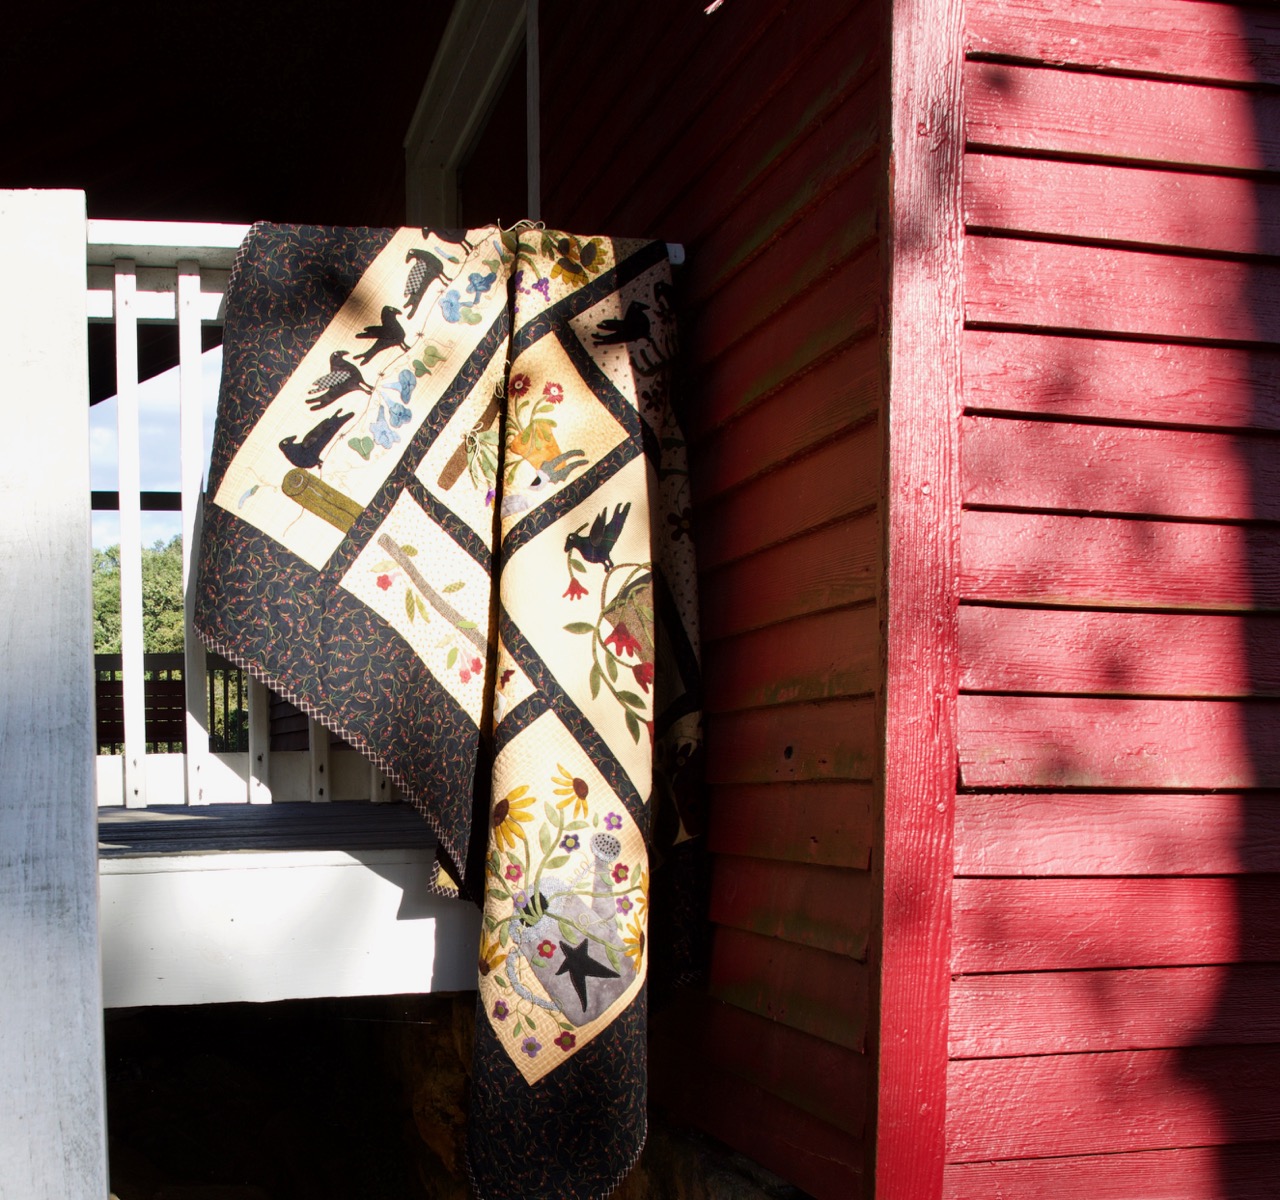
The skies were heavy, so I stopped at the first picket fence with a color-coordinated house behind it, and snapped this view.

In a couple of shops, I saw welcoming vignettes and store owners graciously let me drape the fabric about their merchandise.  It’s amazing what a crazy old woman can get away with if she bothers to ask.

In a tee-shirt shop, I was amazed that they had laid out a display of shirts in just these feedsack colors!

And then, Sailor sauntered by and plopped down for a nap.  He was kind enough to model the quilt, creating a unique spot for Fairhope Feedsacks to rest.

At the pier, pilings and tree roots served as quilt racks.

And, at a candy store, more fences, porch railings, an old dresser, and even a baby carriage, a blue baby carriage, gave the little bit of a quilt a place to perch.

Now I’m looking for places to take some other small quilts.  I love making the little ones.  And since I”m doing it for fun, who cares what size it is?  I know a lot of people think a quilt has to cover a bed.  I’m so glad they are wrong!  

Fairhope Feedsacks measures 19” x 24” .  The logs finish at  3/4” wide.  I probably used Dream cotton request batting and cotton thread.  

Lessons learned from this quilt:  

Washing a quilt gives it a softened aged look instantly.  

I personally don’t like the same fabrics used in the same position in a log cabin (that’s what I did here, giving the double dose of turquoise every time the blocks meet).  I like the colors to be more random, scrappier.

The result, this little piece, was one of my first attempts at free motion quilting.  I used a variegated thread and a simple meandering stitched path.  It’s not complicated, It’s not a competitive piece, but the little quilt is pleasing to hang about the house…or on fence posts, or at the beach, or on a cooperative doggie.

Here is a photo of Fairhope Feedsacks at home, atop the clock in the breakfast room where it hung out all summer with a compatibly colored rooster.  

Miss Nellie’s Country Garden

On a recent Saturday ride-about, we took a big wool quilt in case we saw a spot for photos.  We found a spot at Starr’s Mill, and gave Miss Nellie’s Country Garden some places to pose.

The quilt is my version of a pattern from Lisa Bongean of Primitive Gatherings.  The wool appliqué is stitched by hand onto cotton background fabrics.  The piecing together of the blocks and the quilting are done by machine.  

As I worked on all aspects of this quilt, I thought of my Aunt Nellie.  The wool appliqué – informal and free – and the garden theme led me to know the quilt had to be named for her.

She was known as Miss Nellie to most everyone in the community.  I was lucky enough to know her as Aunt Nellie.  She was a teacher, and so there are some people who knew her as Miss Hobby, too.  She lived next door for my entire childhood, and serves to inspire me every day of my life. 

She lived to the age of 91, and only in her 91st year was she unable to tend her garden.  She grew vegetables to eat, to share, to can, and to freeze.  She grew flowers for the joy of the bloom.

Aunt Nellie’s vegetable garden was neat and orderly, but her flowers were a riot of stems and leaves and blooms.  Weeds were kept at bay in both places, but the separation she maintained in her butterbeans and squash was not valued in her flowerbeds.  The snapdragons and pansies, the petunias and lilies and gladiolas all mingled about, with her snipping a cutting here and poking it in an empty spot there to take root and fill a space.  And, take root they did.  Her green thumb was legendary, possibly due in part by the load of fresh cow manure a local farmer delivered to her every spring.

She grew geraniums in pots, dahlias in a  separate bed all their own.  She had a bit of yard art, too.  I remember a whimsical bird bath, tiers of porcelain basins given to her by a friend.  Once it developed leaks, it was repurposed as a planter for succulents.


So the whimsical nature of some of these quilt blocks is a perfect tribute to a woman from the country.  The label is a block I had made because Miss Jump, one of Linda Brannock’s creations, reminds me of Aunt Nellie.

More quilt details:  The quilt finished at 60” x 75”.  I used a whipstitch to secure the wool to the cotton, usually with perle cotton thread, but sometimes with embroidery floss or even fine sewing thread.  The quilting is all hand-guided freemotion stitching on my home machine.  I used Dream Cotton Request batting and a cotton fabric for the background.  And it was all fun!  Just as Aunt Nellie would have wanted it to be.

Oh, and another detail.  Because the wool is so visually heavy, I made a wider binding than I usually do.  The “standard” 1/4” binding seems so wimpy on a large wool quilt, so I cut the binding 3 1/2”, then folded in half and stitched it to the front of the quilt with a hearty 3/8” seam allowance (or scant 1/2”).  The binding then finishes (with these fabrics) at 1/2”. I used a woven plaid (easy to stitch down by hand) and cut it on the bias.

More about Aunt Nellie:  I’ve written a lot about Aunt Nellie already, if you type “Nellie” in the search box, you’ll find several references to her.  But, she is the older of the two “Spinster Sisters” in this post, where I shared more details of her: https://sandygilreath.com/spinster-sisters/

Remember Me

In our household, we often quote favorite movie lines to convey a big message in a few words.  A bit like a secret language, the power of a select phrase can convey a sense of place, a mood,  or a personality,  and add to the bond of family.

One phrase that’s part of our oft-repeated mantras is “remember me?” spoken in the tone Julia Roberts used in Pretty Woman.  You know the scene when she returns to the uppity sales clerk who had refused to help her.   Laden with packages from another Rodeo Drive shop, she twirls about and smugly displays her loot.  There’s a follow-up line about working on commission and “Big Mistake.”  We quote that sometimes, too.

Several years ago, when I was a member of a mini-group of quilters who called ourselves The Basket Cases, we exchanged blocks to make quilts.  The rules were: make a 9” basket for each other member of the group, in the color specified by each gal; then make your own quilt with the result.  I chose blue (big surprise), as did Mary.  Susan asked for red and pink.  Dale requested pastels, and Angie’s color was terra cotta.


The single basket block you see here is from one set of blocks I made to exchange.  The others I made for them were similar, but with pieced bows at the top, not appliquéd bows like these.  I made some of that type in blue for myself, too.

We made the exchange baskets twice and each assembled her own quilt using whatever setting was desired. I had eight baskets from friends (you can find four pairs of similar baskets in my quilt, each pair from one quilting sister) and four I had made.

I struggled with the various shades of blue and the different levels of contrast until I remembered how I love brown with blue.  This dark brown polka dot seemed to be the perfect fabric to enclose the group of baskets and serve as a border.  

I tried the polka dot as alternate blocks, but the big blocks of color were distracting.  So back to the sewing machine.  I made six 7” basket blocks, framed them with 1” borders of the brown which acted as sashing, and was done.

So it was time for a title.  The brown polka dots reminded me of a dress Julia Roberts wore at the polo match in Pretty Woman.  So, Remember Me was the perfect phrase to convey the movie connection and the spirit of the exchange blocks with the Basket Cases.

The photos of the quilt were made on an outing to Auchumpkee Creek.  Jim made some photos, I made others.


In this photo, you see the back of the quilt with a tree’s shadow on it.  As I often do, I pieced the backing with several blue fabrics.

I did not do the quilting on this one.  My friend and longarm expert, Kathy Darley, did a great job putting the layers together.

Floozies

When I shared photos of quilts at Step Back, I promised details on the quilts I took on the visit.  So, for those who are wondering about the Floozies quilt, here is its story.

On my first visit to Step Back, I mentally named this cabin “Waiting for Chinking,” since that’s the stage it’s in.  I think there’s an art quilt with that title in my future, featuring this cabin.

When I later learned that this cabin is where the “floozies” hang out during the annual Christmas celebration, I knew I wanted my Floozies quilt to be photographed there.

One of the volunteers was kind enough to pose as a floozie with the Floozies! These fine upstanding women of the community act as hostesses at Step Back.  They dress in vintage clothing and pose for photos and provide history lessons for visitors.

In other settings, Floozies is a brightly colored quilt.  I love how the weathered gray of the buildings provides low contrast with the background fabrics; subduing things, making the birds seem right at home.

The title I used, A Flock of Feathered Floozies, came to me after a year of working on these birds to stitch them in place, then embellish them with beads and elaborate stitching using all kinds of rich threads.

The pattern, hand-dyed wool, and accessorizing threads and baubles came from Sue Spargo in her block-of-the-month pattern a few years ago.  I had taken a class with Sue in the past and knew there was a lot more to learn from her.  And learn I did.

In each month’s  packet there were actually materials for three blocks.  Wool background, wool for the birds, instructions, and embellishing threads of cotton or silk, of all sizes and twists.  There is a lot of detail in each block, so click on the photo to enlarge to see things more closely.

The project was time consuming for sure.  These birds were my companions virtually every evening for a year.  As we watch tv, I’m usually doing hand sewing.  Sometimes it’s a binding, sometimes it’s appliqué, but for that year, it was these birds.  Every bit of appliqué and embroidery was done by hand.  The sewing machine was used only when it was time to assemble the blocks and then quilt the layers together.

I kept up with the schedule, finishing each month’s three blocks just in time for the delivery of the next.  I would get an email from Sue’s son when the next month’s block had shipped.  If I wasn’t done, I would stitch faster!  My self-imposed rule was not to open a package until the previous blocks were completed.  Since I was anxious to see what Sue had planned for the next birds, I made sure I was ready when the mailman came.

With Sue’s companion book Creative Stitches beside me, I learned all kinds of embroidery stitches I had not known before.  The wool appliqué was done with a whipstitch with matching wool thread, so it’s virtually invisible.  Then each piece was backstitched with a Valdani #12 perle cotton thread.  Sometimes other threads were used for embellishing stitches, sometimes the Valdani.  

The background pieces were often embellished with ribbon or linen or cotton fabric, as are the birds.  Just look at the French knots on the linen portion of this block.


Of all the new stitches I learned, I think I was most fascinated with the drizzle stitches.  See them here?  They make a loose fringe-like decoration on the tail of the bird above, but if left longer, they can be couched down to hold them in place.

Once the blocks were completed, assembled, and a border (with a lot of wool circles appliquéd, surrounded by embellishing stitches) added, it was time to quilt.  I used a thin cotton batting (Dream Cotton Request) and a free motion stitch to secure the layers.  I love how the stitching shows up on the wool.

Obviously, many of these techniques are now part of my stitching repertoire. The quilt hangs in my sewing room, providing me with constant exposure to the idea to “do more, more, more.”  And I do.

Sue’s title for this quilt (and a pattern is available now) was Bird Dance.  But every southern girl knows that if a woman is overdressed; has too many accessories, she is in danger of being considered a floozie.  I love to see people smile when they look at my work, and this piece has generated a lot of giggles when people see the title, A Flock of Feathered Floozies.

And, there is a still at Step Back.  So Floozies collapsed there for a rest.

In case you missed them, earlier posts about Step Back are here (Christmas at Step Back) and here (my quilts visit Step Back).  And this earlier post has details about wool appliqué.


Quilts at Step Back

This is a preview post of several quilt stories to come.  As you know, I love to photograph my quilts in unusual settings and sometimes leave home with one or two, then blog about the quilt in detail.

Today we had the opportunity to revisit Step Back, a privately owned rural community with twenty 1900-era buildings.  An earlier post with details about this place is here.

When our camera club was invited to come stroll about the grounds with cameras, I asked if I might bring some quilts.  When the answer was “yes,” I gathered a few pieces whose stories are waiting to be part of a blog post.  So today you see some glamour shots – later more complete stories.

The silvery gray buildings were a wonderful backdrop for quilts to shine.  Sometimes the contrast was minimal, other times it was strong, but always, the old buildings brought new character to fabric and stitches. As always, you can click on any image to enlarge and see details.

Miss Nellie’s Country Garden posed near the waterwheel.  This 12 foot wheel is perfectly balanced and turns with just the tiniest trickle of water as its power source.

Miss Emily’s Baskets rested in some cotton baskets inside the mill house.

This is the cabin where local ladies pretend to be floozies at the Christmas open house every December.  I thought my wool quilt, A Flock of Feathered Floozies, needed to pose here.

Here, Where the Soul says Ahhh is hanging inside the entry of the schoolhouse.  

And here you see why I chose this quilt for the schoolhouse.

A little goat quilt rides on a tricycle.  This quilt has been the subject of an earlier blog post here , but it seemed that a goat quilt needed to visit Step Back.  

Guineas visited Step Back, too.  Guineas on Parade posed at the base of the windmill and on the floozies’ porch. 

And, a man in overalls was visiting today. Of course he was.  A trip back in time to a rural setting would not be complete without that image!

For more details about the Step Back village, visit http://seniornewsga.com/NewspapersSN/Atlanta/2015/AtlantaSeniorNewspdfdec15.pdf or like the Step Back page on Facebook.

Backsides


I like backsides.  When I’m doing street photography, I often focus on images of people from the rear.  Maybe that’s because I think the result is more likely to convey a universal truth than if the face is there; identifying the individual as, well, an individual.


With quilts, too, I like the backsides to be interesting compositions.  The expected traditional way to back a quilt is to use yardage of one fabric.  I admit I do that sometimes.  But most often when I do that, I find the result to be boring to me.

I often piece the backs of my quilts, especially the large ones.  The blue “wonky star” above is on the back of GBI Blues.  I included lots of my favorite blue fabrics that hadn’t found a home on the front.  In 70 and Still Wearing Jeans, I used pieces of fabrics collected for Jim’s quilt where the images were too large to include in the stars on the front.

In Seven Black Birds, I incorporated the discarded half-square triangles created for the sashing in the back.  That quilt hangs on a ladder in the den and more often than not, the “back” side is what is turned out to the viewer.  That’s the quilt here on the hayrack and bicycle.

Sometimes I have fabric that I don’t want to cut up into little pieces for use on the front of the quilt, so I use a whole piece of it as the back of something.  That way I can leave the piece as a whole unit. The toile piece in the photo above is on the back of Blue Tumbling Blocks, a small wall hanging described here.   I recently wrote about Linen Baskets in which I did the same thing with a fabulous Jane Sassaman print.

My most recent piecing effort was inspired by a piece of fabric I’ve had in my stash for many years.  I just didn’t want to cut it up.  So a pattern involving books (paper foundation pieced) seemed perfect for the front of a quilt with the “reading” fabric on the back.  So, it’s true.  I designed a quilt with the back planned first.  Here is a photo of the backing fabric folded on top of the pieced top.  More details and photos will follow when the quilting is done.

Linen Baskets

We headed out the door on a “Saturday ride-about”, bringing cameras and a quilt.  This depot was abandoned at the moment, so we posed the quilt and snapped a few shutters.  

This little quilt, Linen Baskets, is a sample I made a couple of years ago when my favorite quilt shop had a fat quarter bundle of linen fabrics.  The polka dots are all linen, the white background is a Kona cotton solid.  Finished, it measures 35” x 43”, a nice size to drape over a chair or hang on the wall. 

I love the little baskets.  They are adapted from a pattern called Big Bloomers from QuiltSoup.  I added wool appliqué in the border with some beading and embellishments.


We live near Zebulon Road, but it doesn’t lead to the town of Zebulon.  That fact amuses us.  We have noticed many Zebulon Roads in the middle GA area which, when studying a map, do not lead to Zebulon either.  So for this little quilt to get to pose on benches and doors and roof brackets of the depot in Zebulon was a fun note to add to our day. 

The quilting is a quick loopy meandering trail done with cotton thread and using thin cotton batting.  The backing is a bright fun Jane Sassaman design.  Many people like basket quilts as much as I do, but when I take this to groups, there are always gasps of delight when they see the back of this one.


I liked the contrast of the soft quilt with the hard lines of the doors and the weathered wood of the floor boards.  Jim did some of his darkroom magic on some of his shots, intermingling color and black and white.  I never get tired of that!

Seven Black Birds

Seven Black Birds is a quilt that’s been on an outdoor photo shoot and I promised more details of its story – a few months ago.

Later is better than never, so here it is.

My friend Kathleen and I shared a love of needle turn appliqué and wanted to make a large album style quilt, each using the same pattern, but varying the fabrics.  We chose the Friendship’s Garden pattern by Barb Adams and Alma Allen.

We shared the plan with other guild members and soon had 20 or more members each making her own version of this project.  At one of our guild’s quilt shows, nine completed quilts made from this pattern were hung together so that visitors could see how individuals personalized their own creations from one common pattern.

I kept detailed photos of my work in progress, so I can share some of my design process through the story of this quilt.

I found a toile fabric in soft shades of brown for my background.  The country scenes in the toile seemed to fit the mood of the pattern  and I chose rich reds, greens, and browns for the appliqué.


Before I was done, the primitive birds in the pattern had been replaced with more sophisticated ones, and I put a blackbird in every wreath in the design.  The one with the nest and its contents inspired the title.  I love to watch people try to find all seven birds.

I made all the sashing blocks (half-square triangles) the pattern described, but when I put them on the design wall, they seemed to overpower my appliqué.  In this photo, some of those triangles have been stitched together, others are just clinging to the design wall.

I redesigned the sashing in a few different ways, auditioned those, and chose the “on-point” strips of squares.

seven black birds

The original sashing pieces were added to the back, making that construction more complex than the front.  But I love it!  This quilt is often displayed on a ladder in the den, and the back is the side turned “out” as much as the front.  The photo above shows the entire back of the quilt as it was hanging at the Ga National Fair.

I quilted the big assembly (it finished at 84″ square) on my faithful Bernina home machine.  Using a 50-weight, two-ply cotton thread I danced with my sewing machine. (I’ve written many posts describing my free motion quilting technique, and if you put that phrase in the search box on the right side of this page, you will find many references.  Perhaps the  process has been described in the most detail here.)

This quilt was finished in 2009.  The photos are from several cameras, some indoors, some out.  That’s why the colors seem so different.  The earlier post with photos at The Farm House Restaurant is here.

Birds of Amicalola

On a recent visit to a train station and refurbished old store, I took my camera and a quilt.  Birds of Amicalola posed on a bench and in front of the weathered boards of Mildred’s Store.

The quilt is made using the same basket pattern I created for Miss Lily’s Baskets.  In this quilt, I used charm squares of Kaffe fabrics for the appliquéd baskets and Cherrywood hand-dyed blue fabric for the background.  I made a lot of these blocks (I still have quite a few left over for some yet unknown project) before deciding how to assemble them.

I had some bright fabric on hand that had birds flying all about vines and leaves.  Those birds said, “we want to fly amongst those baskets.”  And the leaves seemed perfect for the wreaths in the baskets of the three focus blocks, so I fussy cut the leaves and birds and attached those elements with the invisible basting stitch I had learned from Jude Hill.  When I quilted, I stitched those pieces down with free motion stitching before moving to the background quilting.

The quilt measures  51 ” x   58″ .  The background quilting was done using silk thread (100-weight) on top, two-ply cotton (50 weight) in the bobbin.  The vine in the border is quilted with 30-weight polyester thread.


Photos of this quilt in progress were included in the post here.  Oh, and we were on a trip to Amicalola Falls State Park when I added the birds and leaves to the basket blocks.  That’s the source of the title.


And here is a closeup of the vine stitched on the border.

You can click on any image to enlarge and see details.

An update to include a photo of the entire quilt:

Here it is hanging in our local guild’s show.  The ribbon is for Best Machine Quilting on a Home Machine.

Fern Fronds and Fibonacci


A historic covered bridge seemed the perfect backdrop for a quilt photo shoot.  On a beautiful spring day Jim and I loaded the car with a couple of cameras, a couple of tripods, and a couple of quilts.

This stop was at the Red Oak Covered Bridge near Woodbury (details and a map can be found here: http://www.exploregeorgia.org/listing/476-big-red-oak-covered-bridge).  The quilt you see is my Fern Fronds and Fibonacci quilt, made in 2007.  It finished at   56” x 61” and features a sunprinted image of an Australian Tree Fern (Cyathea cooperi ) which was growing in our backyard garden at the time.

Some of my first explorations into putting images onto cloth were through the process of sunprinting.  This predates the printing, painting, and dyeing I’ve been exploring more recently.

The life size image of the fern frond measures 29“ x 34“.  The turquoise and white blueprinted image needed some color to give the quilt a more spectacular “wow” factor, so I chose to include a variety of brightly colored fabrics in the border.

Many batiks were used, along with some fossil fern prints.  I still love that line of fabric, and continue to use them a lot.  They are soft and loosely woven, but to me this makes them turn easily for appliqué.

To create a unique border, I referred to the Fibonacci sequence – the infinite mathematical sequence 1,1, 2 ,3, 5, 8, 13, 21, 34… .  Each term of the sequence (after the first two) is found by adding the preceeding two terms.  For those of you who want a math review:   t1 = 1, t2 = 1, tn+1 = tn + tn-1.  And the answer to the inevitable test question, “is it arithmetic, geometric, or neither?” can be found at the end of the post.

The Fibonacci sequence is found in the growth pattern and leaf structure of many plants, including ferns. Google will help you with more intense investigation if you want to pursue it.

To interpret this into my quilt, I made colored rectangles all 1” tall, but whose widths were 1”, 1”, 2”, 3”, 5”, etc.  To avoid single loooong bands of color, I did not use a length greater than the 34” (limiting myself by the dimension of the plant image itself), I just repeated that sequence in a spiral until I was satisfied with the look.


The woven ribbon portion of the border was a design taken from one of Sally Collins’ books.

I was very inexperienced with machine quilting at the time and didn’t feel confident stopping and starting at the edge of the design.  So I quilted the grid in the sunprinted space by hand.  Make that read BY HAND.  That pretreated fabric is more closely woven than your normal quilting cotton making this a less than pleasant experience.  I used Dream Cotton batting which is nice and thin and generally easy to quilt through.  But now I know that wool would be sweeter to needle.  I don’t think wool batting was widely available at that time.

Then I dared to freemotion quilt fern fronds in the border space.  I traced a section of the fern, transferred it to the fabric using a lightbox, then stitched with an invisible polyester thread.

As I write this, I am amazed at how much I’ve learned since that experience.  But even though it’s full of what many would see as mistakes; I love this quilt.  I still love the fern.  I love the unique opportunity to combine nature and mathematics in fabric, and I love that I’m still learning things about quilting.

At the time I printed this image, I made many more blueprint images of plants including multiples of this plant.  I love planning ways to include these fabric images in new projects.

Older posts with details of other quilts with sunprinted images are these:

https://sandygilreath.com/gbi-blues/,

https://sandygilreath.com/whats-in-a-name/ (this one had a sunprinted label)

https://sandygilreath.com/annie-maes-lace/

Answer to the math question:  neither.  Arithmetic sequences are generated by adding a fixed constant to one term to get to the next; geometric, by multiplying.  Neither is the case in this sequence.

The black & white photo with color accent is Jim’s darkroom magic.  The other photos are mine.  If you think the fern is blurry, it’s not the camera.  It’s the motion of the fern in the wind during the 15-minute sun exposure.